Introduction
This article will help get you started using Visual Studio 2015 in combination with Unity 5.2. If you already know how to do that then this article isn't for you.
I've tested this on a fresh PC install with Windows 7 (SP1 and latest updates).
I'm using Unity 5.2.1f1 64 bit (and as I'm writing this a new point release is already out) and Visual Studio Community 2015.
So you might be asking, why use Visual Studio instead of MonoDevelop? I'm not sure I can answer this question without swearing. This isn't something I want to cover in this article, so I'll just say that I've been using Visual Studio for a long time. Not only is it my personal favorite, but it is commonly considered to be one of the best IDEs.
Unity 5.2 and Visual Studio Community make an awesome combo. They are both free for personal use. When up and running you'll use Visual Studio to edit and debug your code. You'll have at your disposal all the lovely Visual Studio features such as intellisense, refactoring tools, nuget (which I'll cover in my next article) and the many useful plugins that are available for Visual Studio.
Unity 5.2 has built-in support for Visual Studio. With previous versions you needed to install the UnityVS package (who were acquired by Microsoft). This is now included with Unity.
Installation
To follow along with this article please download and install:
Visual Studio is rather large and comes with many extras. You don't need the extras for basic work with Unity (although you might want them for other reasons). So uncheck all the extras and just install the basic package. This will save hard drive space and download/install time.
The easiest way to install Visual Studio is via the web installer. However should you need to install Visual Studio on multiple PCs you may want to pre-download the iso to save yourself time. You can find the iso by digging deeper into the previously linked download page. To install from the iso you will need to mount it as a virtual drive.
Create Scripts from Unity
When you first add a script to Unity it will generate projects and a solution that can be opened in Visual Studio. Unity will regenerate the solution as necessary as you add or rename scripts and dlls. It is worth noting at this point that the Unity development process is different in this regard to traditional programming (at least when using Visual Studio).
Normally when working with Visual Studio a coder will create and maintain the solution via Visual Studio. Unity has changed this: it creates and maintains the solution for you. If you are a coder from before the time of Unity then this could catch you out! If you believe you can modify your solution by hand you will soon discover that Unity has stomped on your changes the next time it regenerates the solution!
Let's cover the various ways of creating and editing code. Please open Unity and create a new project.
Before we can open the solution in Unity we must create a script. This causes Unity to generate the solution. There are several ways of doing this. We'll start with the simplest. Right-click in the Project window, click Create then click C# Script:

This creates a stub script with a class that inherits from MonoBehaviour. You now have a component that can be attached to scene entities to add behaviour to them (this is Unity's take on the entity/component pattern).
Now that you have created the first script, you can open the project in Visual Studio. Open the Assets menu and click Open C# Project:

Remember that it is only after creating the first script that the solution is generated and can be opened in Visual Studio. If you attempt to click Open C# Project before adding the first script, nothing will happen! (nice one Unity).
Now your solution should be open in Visual Studio and you can edit your code.
Open Scripts in Visual Studio from Unity
Many times during development you will need to switch from Unity to editing a script in Visual Studio. There are several ways to do this.
If you can see the script already in the Project window you can right-click and click Open:

You can also simply double-click on the script.
Or, with the script selected in the Project window, go to the Inspector window and click Open:

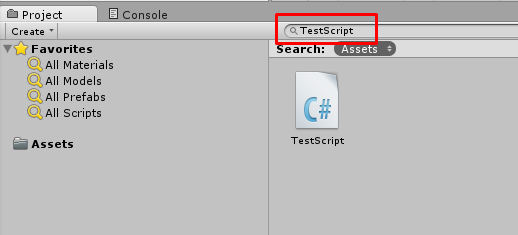
If you need to find the script (because it's nested in some subdirectory) you can search for it by name in the Project window. Note that you can search for scripts by specifying a full or partial name.

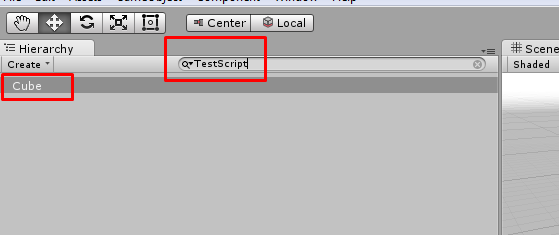
You can also search for and edit scripts that are attached to GameObjects in the hierarchy. Note that when you do this you must use the full name of the class, you can't use a partial name. In this example searching for TestScript works but Test or Test Script does not work.

From the Hierarchy select the GameObject, then from the Inspector click the cog next the script component and click Edit Script:

Create Classes from Visual Studio
New code can also be created from Visual Studio. Of course all your scripts must be placed under the Assets folder, otherwise you'll lose them from the solution when Unity regenerates it.
So why not just create all your scripts from within Unity? Creating scripts from Unity is all good and well when creating MonoBehaviours. Of course this is something we often do when working with Unity. However there will be other times when you'll create classes that are not inherited from MonoBehaviour. If you create these scripts via Unity then you'll get a MonoBehaviour and you'll have to modify it manually to not be a MonoBehaviour. This isn't too hard, but why do it that way when you can create basic classes directly from Visual Studio?
With the Visual Studio solution open, go to the Solution Explorer and expand your project. Select the Assets folder, right-click, click Add, then click Class:

Now enter a name and click Add:

You should see your new script in the Solution Explorer:

Note that the new class doesn't inherit from MonoBehaviour, in fact it doesn't inherit from anything. This is they way we want, you are not free to inherit from any class that you want or none at all.

When you switch back to Unity it recognizes your new script and updates accordingly.
Finding Code in Visual Studio
As your code-base grows you'll need convenient ways of finding your classes and functions. Visual Studio to the rescue!
You can search for code via the Solution Explorer. Use the hotkey Ctrl+; for ultra-fast access.

You can find functions in the current script using the dropdowns in Visual Studio's toolbar.

Conclusion
Now go forth and use Visual Studio to edit your code. In the future I'll cover debugging.
We have only looked at a few of the tools that Visual Studio offers. There is so much more for you to explore. Happy journeys!