Testing is required to produce working code, but it can be difficult and take a lot of time! By reducing the time and cost of testing, we can increase the pace at which we can ship reliable and working features to customers.
In this article, we'll explore easy and quick ways to collect and generate data and create schemas for testing.
A Specification for Node.js Testing
We need a testing method that easily plugs in new data and generates new tests. For this, we’ll use the test specification created in an earlier simplified contract testing article and then elaborated on in my article on fuzz testing.
Let’s assume we are already generating Jest tests from JSON schemas, a kind of data-driven test generation, as shown below:
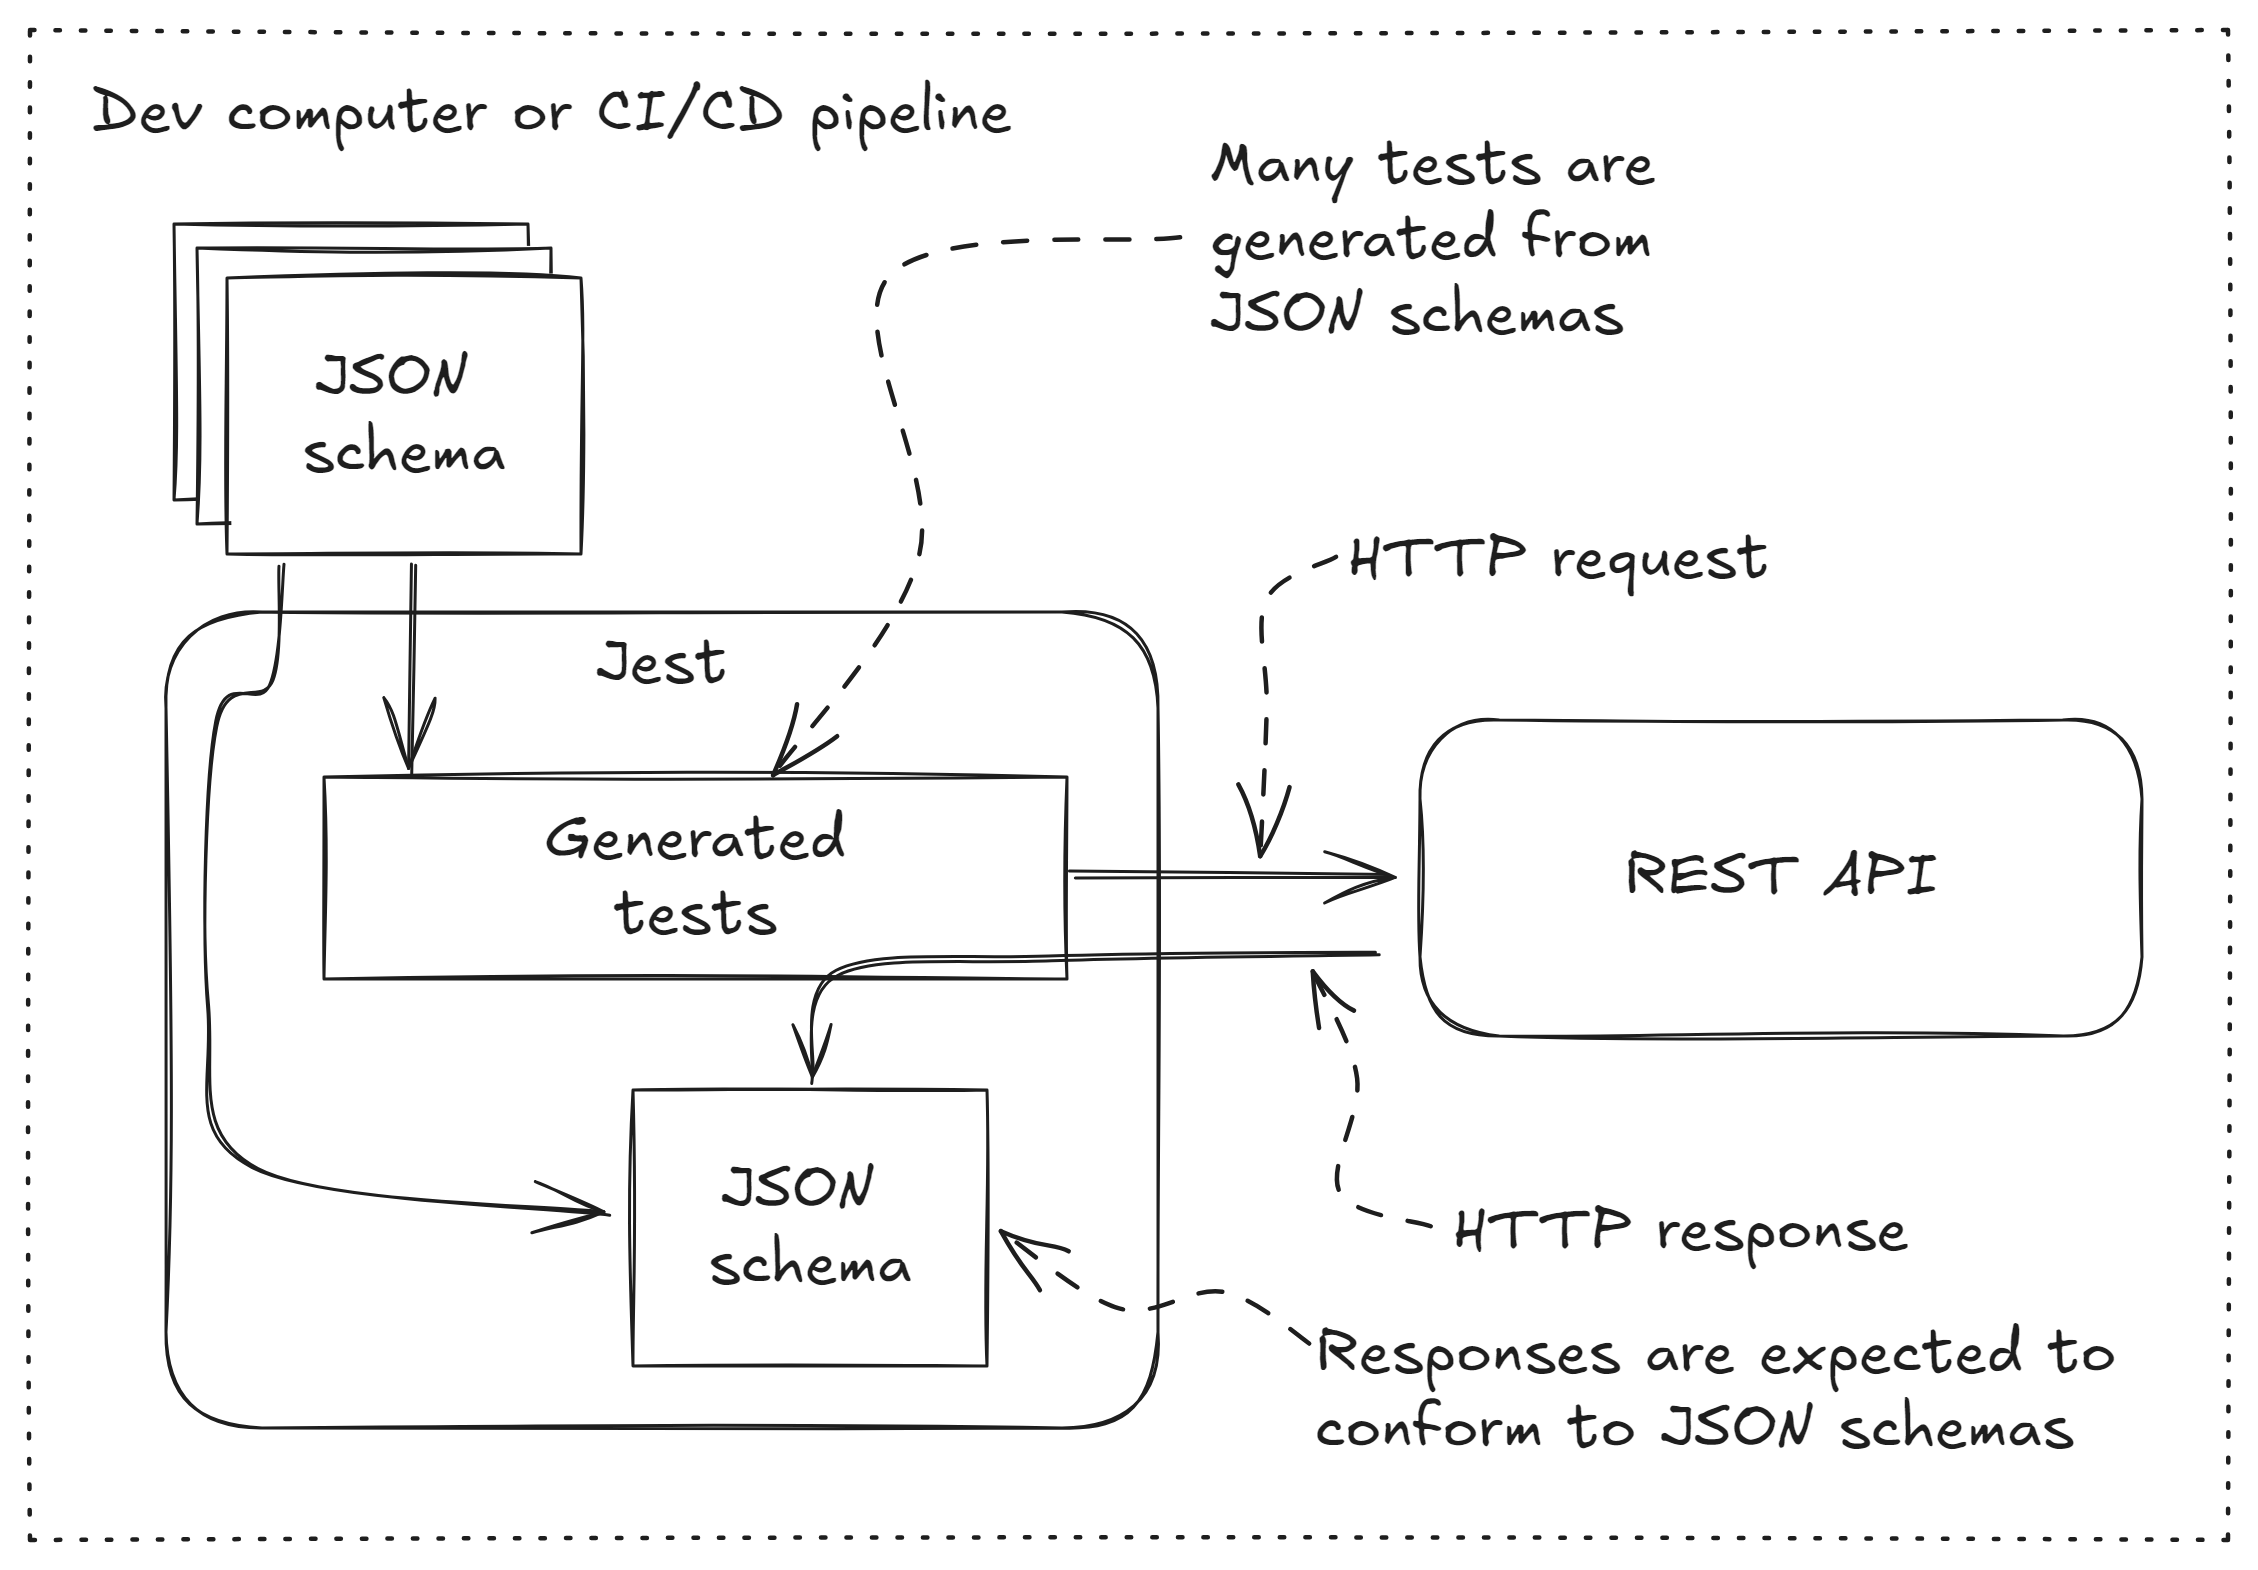
This small example of a test specification in YAML invokes the HTTP POST endpoint /posts that send a payload to create a blog post. This specification generates a Jest test, which makes the specified HTTP request and confirms that the response matches the requested JSON schema. For complete details on generating Jest tests from this specification, see the article on contract testing.
schema:
  definitions:
    CreatePostResponse: # <-- JSON schema that specifies the format of the response payload.
      title: POST /posts response
      type: object
      required:
        - _id
      properties:
        _id:
          type: string
      additionalProperties: false
specs:
  - title: Adds a new blog post # <-- Tests a HTTP endpoint.
    description: Adds a new blog post to the REST API.
    fixture: many-posts
    method: post
    url: /posts
    headers:
      Content-Type: application/json; charset=utf-8
    body: # <-- Payload to the HTTP request.
      title: A new blog post
      body: A great blog this is.
      userId: 1
    expected:
      status: 201 # <-- Expected HTTP status code.
      headers: # <-- Expected HTTP headers.
        Content-Type: application/json; charset=utf-8
      body: # <-- Expected response payload.
        $ref: "#/schema/definitions/CreatePostResponse"
Generating Jest tests from a specification as shown here is a nice way to make our testing data-driven. To create more tests and test more endpoints in our REST API, we simply add more data points to the test specification. This doesn’t require any new code. Generating tests from data has a huge potential to give us more testing for less effort.
But still, figuring out the data required and piecing together example data and JSON schemas by hand is tedious and tiresome work. Wouldn’t it be great to simply record data and generate JSON schemas for our tests?
Generating JSON Schemas from Data
Our first stop in this tour to generate schemas and data is json-schema-generator, which we can install from npm. Using this tool means we can generate JSON schemas from any existing data. Here's how it works:
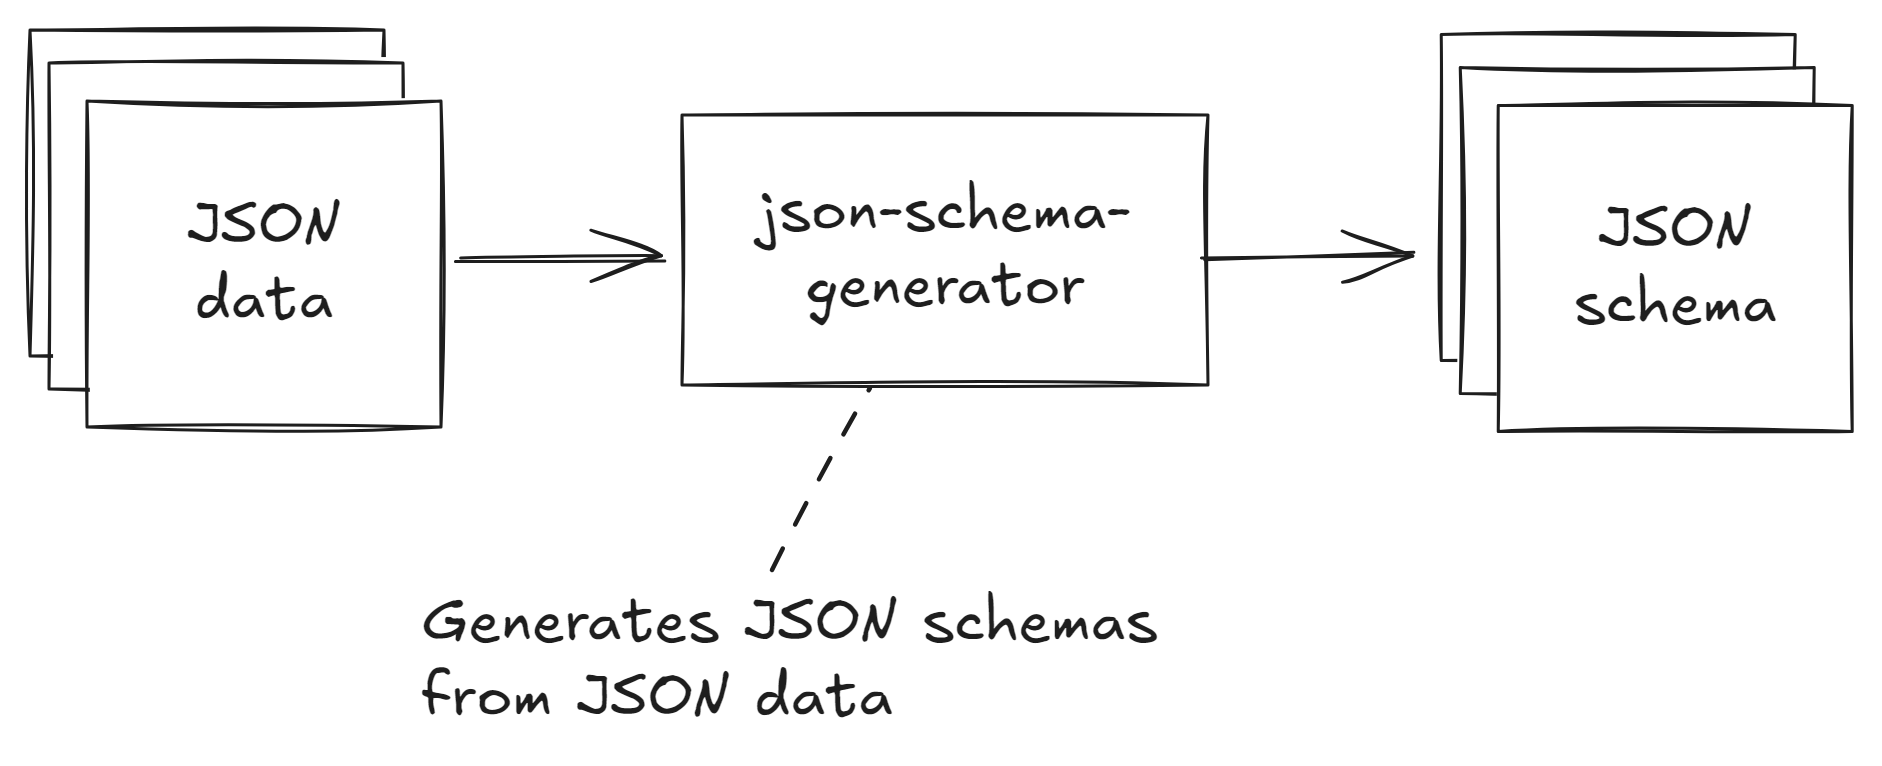
For example, consider the JSON data for the following blog post. This is a small piece of example data you can try out for yourself by running the commands below. You can imagine that real-world data is much bigger than this.
{
    "userId": 1,
    "title": "A good blog post",
    "body": "This was a really entertaining blog post."
}
Before we can use json-schema-generator, we must install it:
npm install -g json-schema-generatorNow we can use it to transform our JSON data into a JSON schema:
json-schema-generator data.json -o schema.jsonThis example produces the JSON schema you can see below.
{
  "$schema": "http://json-schema.org/draft-04/schema#",
  "description": "",
  "type": "object",
  "properties": {
    "userId": {
      "type": "number"
    },
    "title": {
      "type": "string",
      "minLength": 1
    },
    "body": {
      "type": "string",
      "minLength": 1
    }
  },
  "required": [
    "userId",
    "title",
    "body"
  ]
}
This might not be exactly what you want, so you might tweak it by hand after generating the JSON schema to get the exact result you are looking for. But still, this is a much quicker way to create a JSON schema than if you had to piece it together manually (while frantically moving back and forth in the JSON schema documentation figuring out how to do that).
The JSON schema we'll look at next is presented in JSON format, which is the default obvious format for a JSON schema. To use this JSON schema in our YAML-formatted test specification, we must convert it from JSON to YAML. I recommend you using the yaml package on npm.
Generating JSON Schemas from TypeScript Code
Another easy way to generate a JSON schema when using TypeScript is to generate it directly from your TypeScript type definitions, as illustrated below. The npm package ts-json-schema-generator makes this easy.
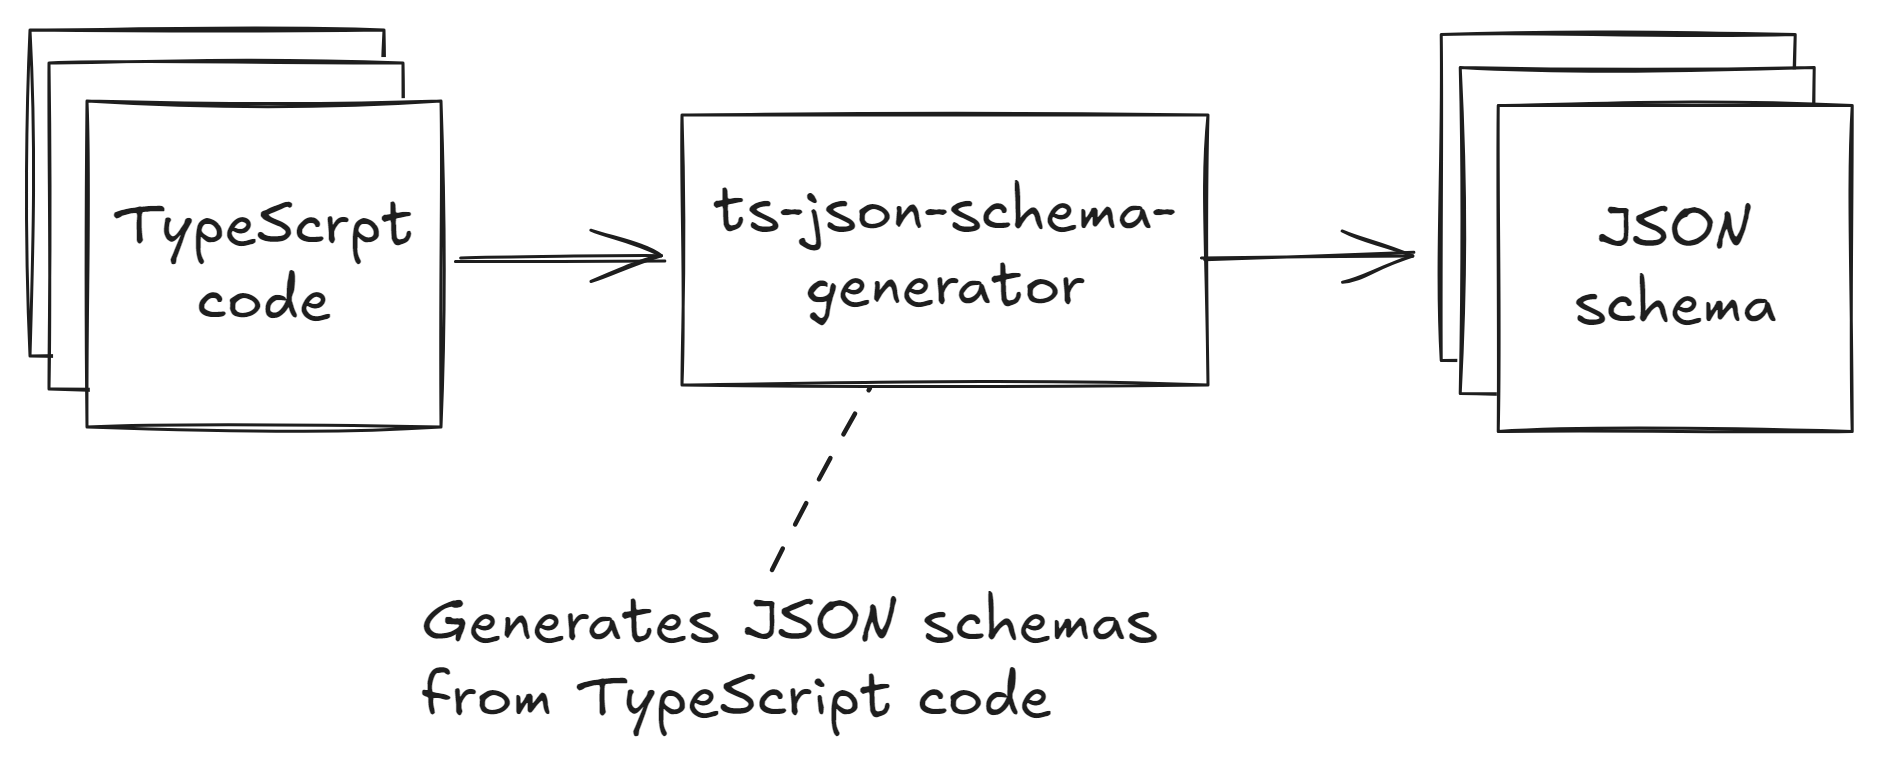
For example, let’s take the TypeScript interface describing a blog structure. We’ll generate a JSON schema from this TypeScript interface:
export interface BlogPost {
    userId: number;
    title: string;
    body: string;
}
First, we must install ts-json-schema-generator:
npm install -g ts-json-schema-generatorNow, it can parse our TypeScript code and generate a JSON schema:
ts-json-schema-generator --path blog-post.ts -o schema.jsonIt produces this JSON schema:
{
  "$ref": "#/definitions/BlogPost",
  "$schema": "http://json-schema.org/draft-07/schema#",
  "definitions": {
    "BlogPost": {
      "additionalProperties": false,
      "properties": {
        "body": {
          "type": "string"
        },
        "title": {
          "type": "string"
        },
        "userId": {
          "type": "number"
        }
      },
      "required": [
        "userId",
        "title",
        "body"
      ],
      "type": "object"
    }
  }
}
Again, you might have to tweak this by hand to get the result you want. But still, it’s much quicker to generate this schema than to put it together manually.
Getting JSON Data for Schema Generation
We have learned how to generate a JSON schema from our existing data. If you don’t have the existing data to hand already, you might be wondering how to acquire it. Below, I present some easy ways to get data you can use in testing.
Copying a HTTP Request Payload from the Network Tab
Perhaps the easiest way to get example data is by using your frontend and then extracting the data from the request and response. Here's one way to do this using the Network tab in Chrome devtools:
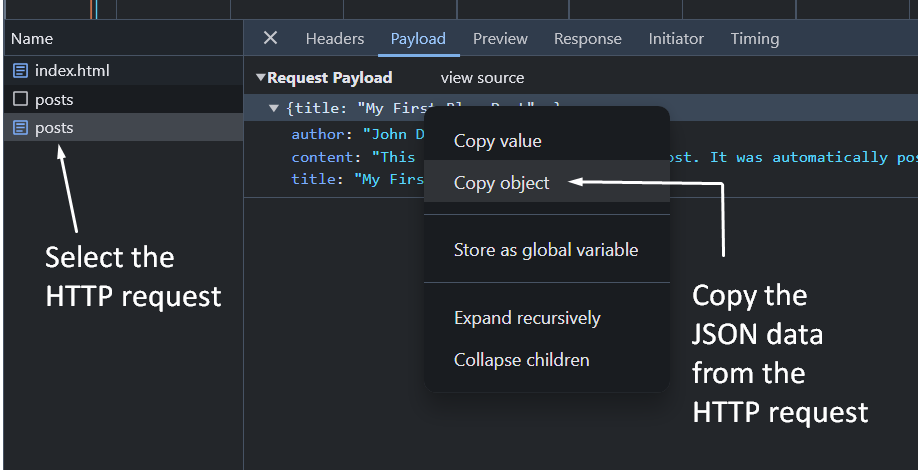
We can select a particular HTTP request and use the context menu to copy the request and response data. We can then use this data in our test specifications and to generate JSON schemas.
VS Code REST Client
If you already have HTTP scripts for VS Code REST Client, curl, Postman, or similar tools, you can make requests directly to your backend. In this case, you already have example request payloads (the ones you use with the tool to make the requests) and can make the request and copy the data you get back. We can use that data to create test specifications and JSON schemas.
Just Console Log It!
If we control the code that we are trying to test, we can use good old console.log to get nicely formatted JSON data:
console.log(JSON.stringify(data, null, 2))You might even like to use some middleware like morgan-body to easily log the inputs and outputs to and from every HTTP request.
Recording a HAR File in the Browser
What can we do if a customer reports a problem and we’d like to create a failing test around the problem?
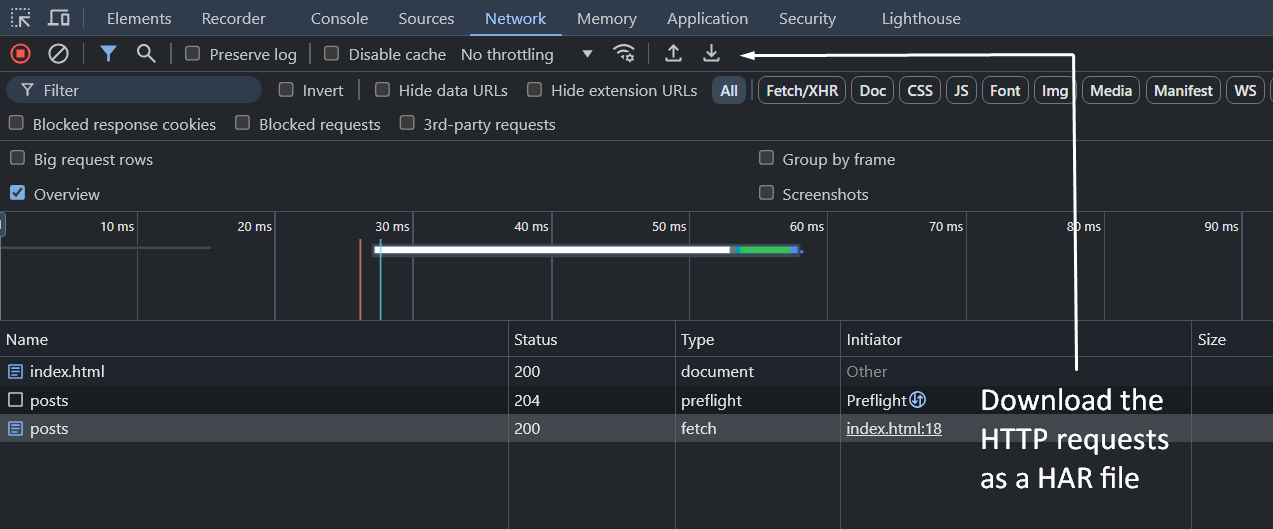
Instead of manually trying to figure out what endpoints the customer was interacting with and what data they were sending that might be causing the problem, we can instead have the customer (or maybe customer support working with the customer) record a HAR file to attach to the bug report.
This is how you can save the HAR file containing the details of the HTTP requests recorded in the Network tab of Chrome devtools:
See a snippet from an example HAR file showing the location of the JSON payload (itself doubly encoded in JSON because the HAR file doesn’t assume the data format):
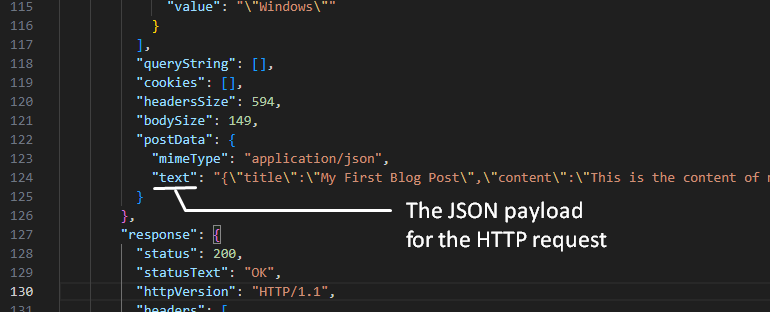
To extract an HTTP request or response payload, you can copy the data and decode it. You may then use that data to test or generate JSON schemas.
Recording a HAR File from JavaScript Code
Do you need something more sophisticated than a HAR file saved from Chrome? Or do you want to record a HAR file from HTTP requests made in Node.js?
Polly.js is an excellent way to intercept and record HTTP requests in JavaScript and TypeScript. We can augment our Node.js code (or browser code, using different plugins) to capture any HTTP requests as they are made and save them to a HAR file. We can then extract the HTTP request and response data to use in our testing.
import { Polly } from '@pollyjs/core';
import NodeHttpAdapter from '@pollyjs/adapter-node-http';
import FSPersister from '@pollyjs/persister-fs';

Polly.register(NodeHttpAdapter);
Polly.register(FSPersister);

const polly = new Polly('my-recording', {
  adapters: ['node-http'],
  persister: 'fs'
});

polly.configure({
  persisterOptions: {
    fs: {
      recordingsDir: '__recordings__' // Location to write the HAR file.
    }
  }
});

//
// ... REST API requests are being recorded ...
//

await polly.stop(); // Stops recording and writes the HAR file.
And that's it!
Wrapping Up
In this article, we covered various easy ways to capture JSON data and generate JSON schemas for use in our Node.js testing.
We can use the data and JSON schemas to build data-driven tests for our REST APIs quickly. Using this style of testing rather than coding (and maintaining) each test by hand saves a lot of time and provides much better code coverage for much less effort.
Happy testing!