Do you need a better way to structure your Unity UI and reduce complexity? Are you looking for a cohesive way to coordinate the multiple parts of your UI?
This series introduces Unity-Weld: an open source implementation of the MVVM design pattern that will help you to structure your Unity UI.
Unity-Weld is the glue between the Unity hierarchy and the code that implements your UI logic. It binds together the parts of your UI: it coordinates them and allows them to communicate. Best of all Unity-Weld is simple: simple to learn and simple to use. It works well with Unity and feels like it fits with Unity's UI system.
In this series of articles I show you how to use Unity-Weld to take advantage of MVVM in your own Unity UIs.
In part 1 I overviewed MVVM and introduced Unity-Weld.
In part 2 of the series I bring you examples that demonstrate Unity-Weld fundamentals: the most core aspects of binding a view-model to your Unity UI.
Unity-Weld is available on github.
Contents
Generated with DocToc
My setup
I am currently using Unity 5.3.4 and Visual Studio Community 2015.
The code has also been tested with Unity 5.4.
Unity example project
A working Unity example accompanies this article and is available on github. Please get the code when you are ready to follow along with the examples presented below. Each numbered example has an associated Unity scene that you can play in the Unity Editor.
Code installation
Take the code from github and simply copy it into your project. Alternately you can build the dll and drop it into your project. Make sure the editor code (or dll) is under an Editor directory.
UI setup
In the following examples I demonstrate the most fundamental aspects of Unity-Weld: how to bind your view-model to your view. You'll learn how to use OneWayPropertyBinding and TwoWayPropertyBinding to data-bind UI properties to the view-model. Then we'll look at how EventBinding binds UI events to view-model functions. There's much more to Unity-Weld of course... but these are the basics you need to start using it.
Steps for creating a UI using Unity-Weld:
- Create a Unity UI. You need all the usual stuff: text, input fields, buttons, etc.
- Create a view-model class. This can be as simple as a custom MonoBehaviour.
- Add the
Bindingattribute to your view-model class and any properties and methods that are to be bound to UI elements. - Attach the view-model to your UI hierarchy.
- Attach binding components (eg
OneWayPropertyBinding,TwoWayPropertyBindingandEventBinding) to your UI elements to weld them to the view-model
In the following examples I show specific examples of creating simple UIs with Unity-Weld.
Examples
Please see the example Unity project to follow along with these examples.
1. One way property binding to a text field
The first core component of Unity-Weld is OneWayPropertyBinding which I demonstrate in this example. It is used to create a one-way data-binding between a property in the view and the view-model.
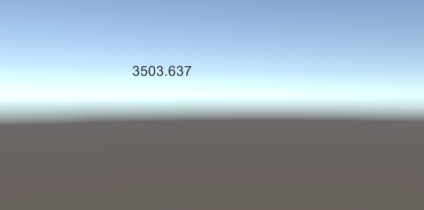
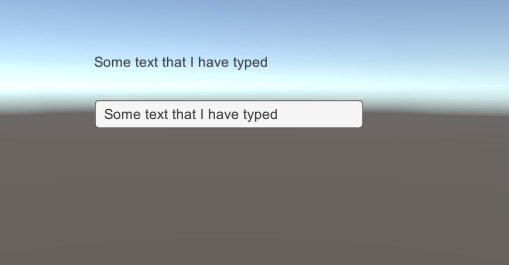
This UI is as simple as can possibly be, it is just a text box that updates periodically to random values:
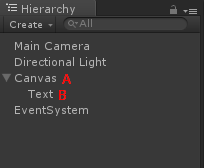
Look at the hierarchy to see the structure of the UI. We have a Canvas [A] that contains a non-interactive Text field [B]:
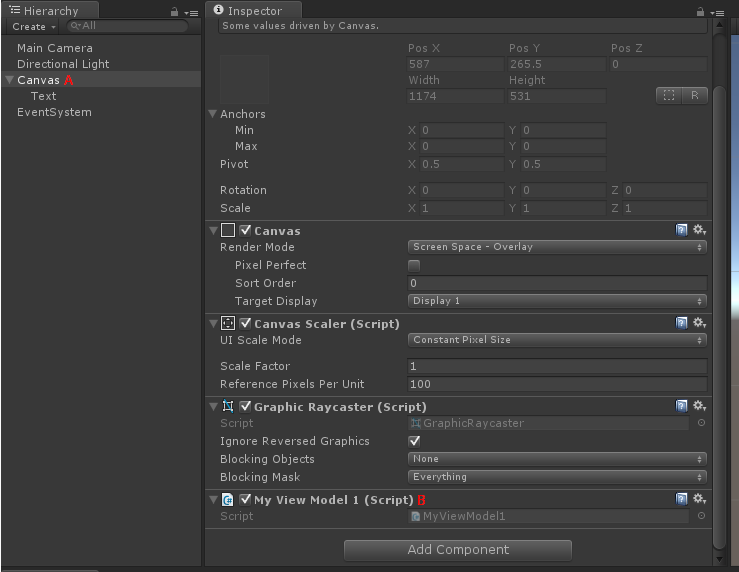
The UI elements in this example are coordinated by the view-model in MyViewModel1.cs. Select the Canvas [A] and in the inspector to see that MyViewModel1 [B] is simply a MonoBehaviour that is attached to the hierarchy:
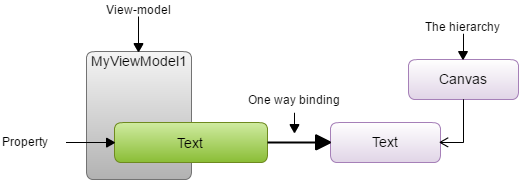
This is a conceptual overview of the connection between the view-model and the view:
Select the Text field [A] in the hierarchy and see that One Way Property Binding [B] is attached:
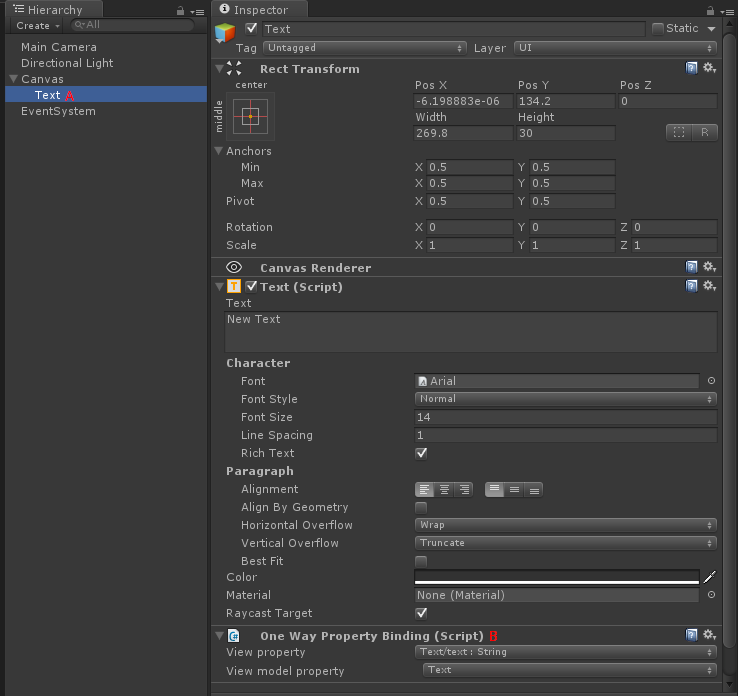
OneWayPropertyBinding is the glue that data-binds the text property in the view to the Text property in the view-model. The value of the property is propagated in only a single direction, meaning that changes to the view-model are propagated to the view but not the other way. This makes sense because a text field in Unity is non-interactive: its value can't be changed in the UI so there is nothing that needs to be propagated back to the view-model.
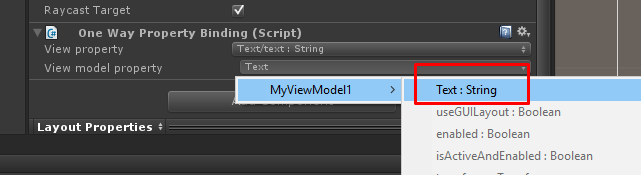
We can configure the data-binding through the Unity Inspector. OneWayPropertyBinding allows us to connect a property in the view [A] to a property in the view-model [B]. In this example the text property [C] has been welded to the Text property [D] in the view-model.

In the Unity Editor you can select from any of the available properties using a drop-down menu:
We've looked at the hierarchy and seen how the view-model is welded to it. Let's look at how the view-model itself is created. Here is an overview (with some code sections folded):
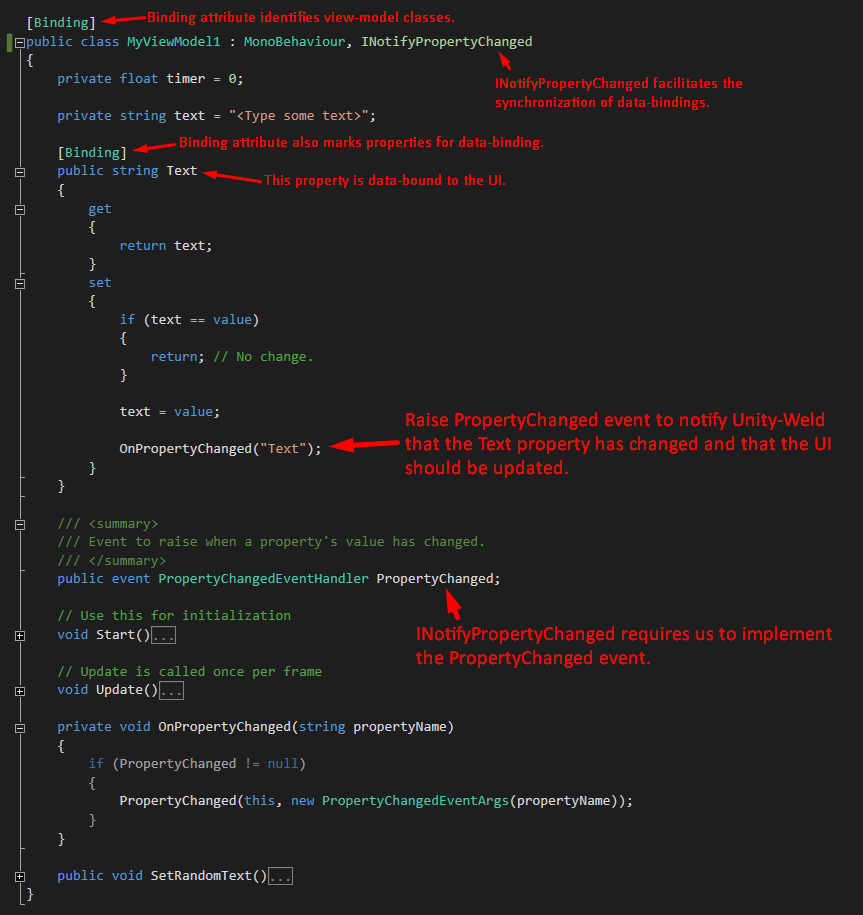
The INotifyPropertyChanged
interface faciliates the synchronization of properties between the view-model and the view. Your view-model must raise the PropertyChanged event to notify Unity-Weld that a value has changed and the UI should be refreshed. This is the same data-binding mechanism that is used in WPF.
The Binding attribute annotates properties that are to be data-bound to the UI:
[Binding]
public string Text
{
    get
    {
        return text;
    }
    set
    {
        if (text == value)
        {
            return; // No change.
        }

        text = value;

        OnPropertyChanged("Text");
    }
}
The setter for such properties raises the PropertyChanged event. OnPropertyChanged used here is a helper method for raising the event:
private void OnPropertyChanged(string propertyName)
{
    if (PropertyChanged != null)
    {
        PropertyChanged(this, new PropertyChangedEventArgs(propertyName));
    }
}
2. Two way binding to input field
The second core component of Unity-Weld is TwoWayPropertyBinding. In this example I demonstrate how to create a two-way data-binding between a view-model property and a UI property.
The example UI here is only slightly more complicated than the previous example. We have a readonly text field and an editable input field. When you type in the input field the updated value is automaticallly replicated to the text field:
The hierarchy for the 2nd example expands on the first example. Again we have a Canvas [A] and a Text field [B]. In addition we have an InputField [C] with a TwoWayPropertyBinding component [D] is attached:
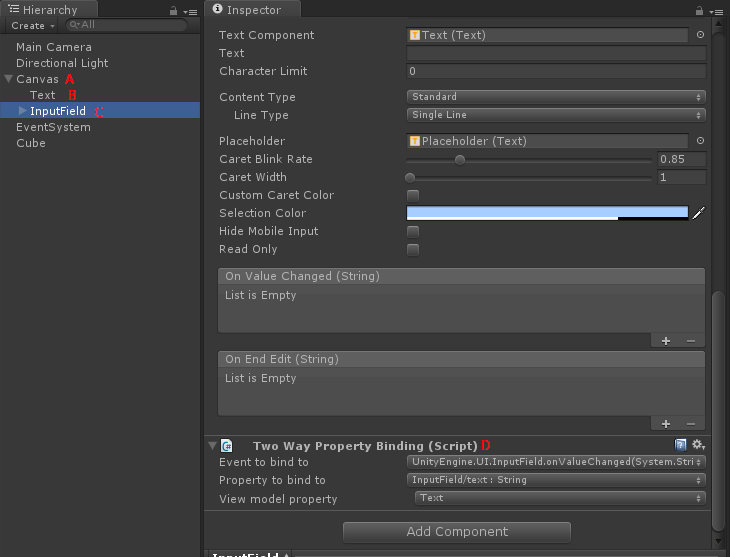
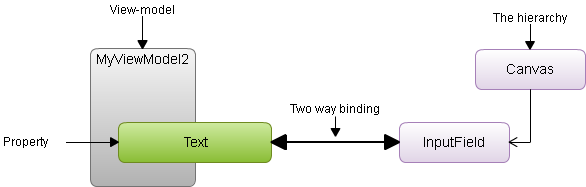
This establishes a two-way relationship between the text property on the view and the Text property on the view-model. When the input field is changed in the UI, the new value is automatically pushed into the view-model. On the flip side, whenever the input is changed in the view-model the value is automaticaly pushed to the UI. The two-way relationship is described in the diagram below:
3. Event binding to a button
The third core component of Unity-Weld and the last we are looking at in this post is EventBinding. This allows an event, such as a button click, to be bound to a function on your view-model, so that when said event is raised the view-model function is invoked.
For this example our UI is as follows:
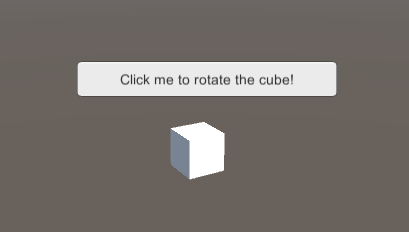
Each click of the button incrementally rotates the cube.
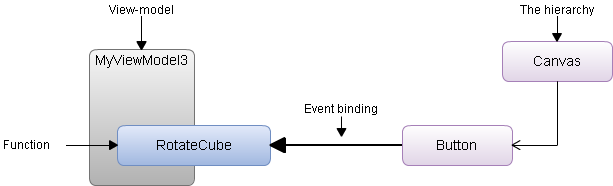
The hierarchy is as follows. We have a Button element [A] in our UI with an EventBinding component [B] attached.
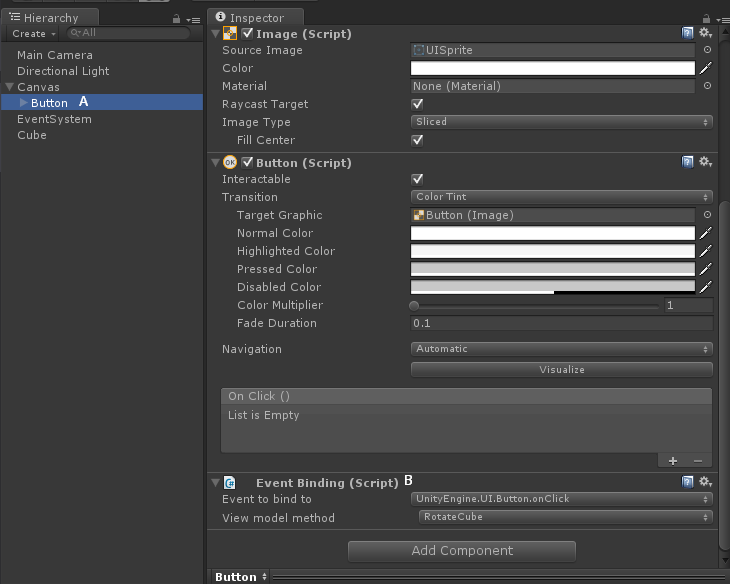
EventBinding has menus to select the Unity event [A] that and the view-model method [B]:

When the event is raised the view-model function is automatically invoked as indicated in the following diagram:
The view-model for this example is quite simple. We mark up the particular class and method with the Binding attribute:
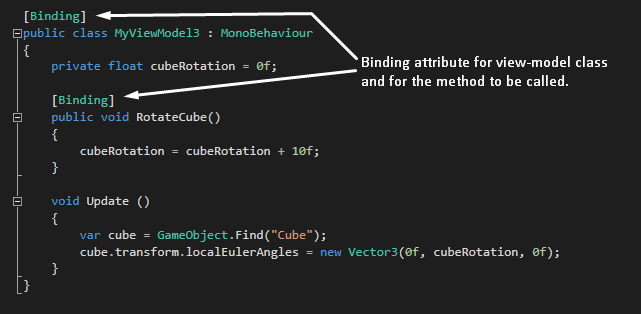
Note that in this example MyViewModel3 doesn't implement INotifyPropertyChanged, this is because we aren't using any property bindings, here we have only used EventBinding.
4. Putting it all together
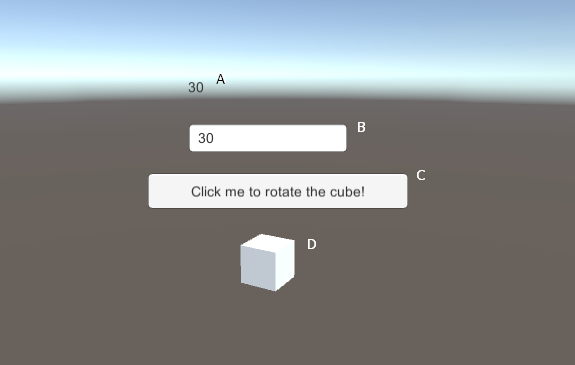
Example 4 combines all the components demonstrated in the previous 3 examples and shows how they work together.
The UI for this includes a text field [A] that displays the rotation of a 3D cube [D]. An input field [B] is used to input a new value for the rotation. There is a button [C] to click that incrementally rotates the cube.
The setup of the hierarchy and the view-model is a combination of previous examples, so I won't cover it specifically.
It is, however, worth looking at the full relationship between the hierarchy and the view-model in the following diagram to see how everything is connected:
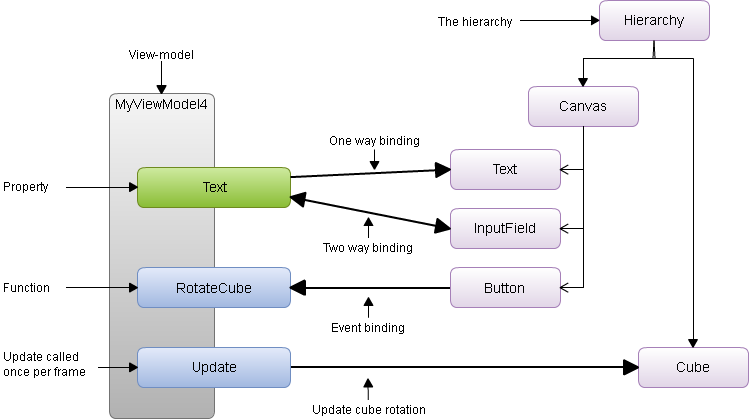
Please have a look at the example Unity scene to see how it all fits together.
Conclusion
In this second post of the Unity-Weld series, I've covered the basics of using Unity-Weld and its core components. Through examples I have have shown how to structure a basic Unity UI using the MVVM design pattern. Hopefully you are starting to see how this can help you structure a complex Unity UI.
Please stay tuned for Part 3 where we will delve deeper into more advanced features of Unity-Weld.