Key takeaways:
- It's easy to add a natural language interface onto any application whether it's a web application or a native application.
- A basic chatbot can be developed by adding a messaging user interface to your application so that your users can talk to the chatbot.
- You can add customized knowledge to a chatbot in OpenAI Playground by navigating to the assistant, enable Retrieval, and then click Add to upload PDF and CSV files.
- You can give the chatbot access to custom functionality in your application using OpenAI functions.
- To enable a better user experience, we can extend our chatbot by adding voice commands using the browser's MediaRecorder API coupled with OpenAI's speech transcription API.
Early in 2023 ChatGPT took the world by storm. There has been a mixture of fear and excitement about what this technology can and can’t do. Personally I was amazed by it and I continue to use ChatGPT almost every day to help take my ideas to fruition more quickly than I could have imagined previously.
The past couple of months I have been learning the beta APIs from OpenAI for integrating ChatGPT-style assistants (aka chatbots) into our own applications. Frankly, I was blown away by just how easy it is to add a natural language interface onto any application (my example here will be a web application, but there’s no reason why you can’t integrate it into a native application).
This article examines what I have learned and hopefully conveys just how easy it is to integrate into your own application. You should be a developer to get the most out of this post, but if you already have some development skills you’ll be amazed that it’s not very difficult beyond that.
At the end we’ll cover some ideas on how chatbots and natural language interfaces can be used to enhance the business.
Live demos and example code
This article comes with live demos and working example code. You can try the live demos to see how it looks without having to get the code running. The code isn’t that difficult to get running though and a next step for you is to run it yourself from the code.
You might like to have the example code open in VS Code (or other editor) as you read the following sections so you can follow along and see the full code in context.
There are two example use cases discussed in this article:
Controlling a map with chat and voice:
- Live demo: https://wunderlust.codecapers.com.au/
- Example code: https://github.com/ashleydavis/wunderlust-example
Asking questions from a custom data source:
- Live demo: https://cv.codecapers.com.au/
- Example code: https://github.com/ashleydavis/chatbot-example
Pre-requisites
To follow along and run the example code for yourself you’ll only need an OpenAI account. Sign up for an account here.
Building a basic chatbot
Let’s start by examining the most basic chatbot. This is adding a messaging user interface to your application so that your users can talk to the chatbot. By itself this isn’t that useful (they could just as easily use ChatGPT), but it’s a necessary stepping stone to having a more sophisticated chatbot.
You can find the full code for the chatbot here:
https://github.com/ashleydavis/chatbot-example
To follow along and run the code for yourself, clone the repository to your computer:
git clone https://github.com/ashleydavis/chatbot-example.gitYou can see the structure of the chatbot in Figure 1. We have a frontend that, when loaded, creates a chat thread. Then we create a message loop allowing the user to type messages to the chatbot which then responds with its own messages.
Note that we must put our own backend server between the frontend and the OpenAI REST API. It would be simpler if the frontend could talk directly to OpenAI, but unfortunately this isn’t possible because we must send it our OpenAI API key. If we sent that directly from our frontend code, we wouldn’t be able to keep it secret.
Our API key must be kept secret, so we can’t allow it to be used in the frontend code. Putting the backend between the frontend and OpenAI allows us to keep the API key hidden. Don’t think this is going to get particularly complicated though, the backend is very simple and mostly all it does is forward HTTP requests from the frontend to the OpenAI REST API.
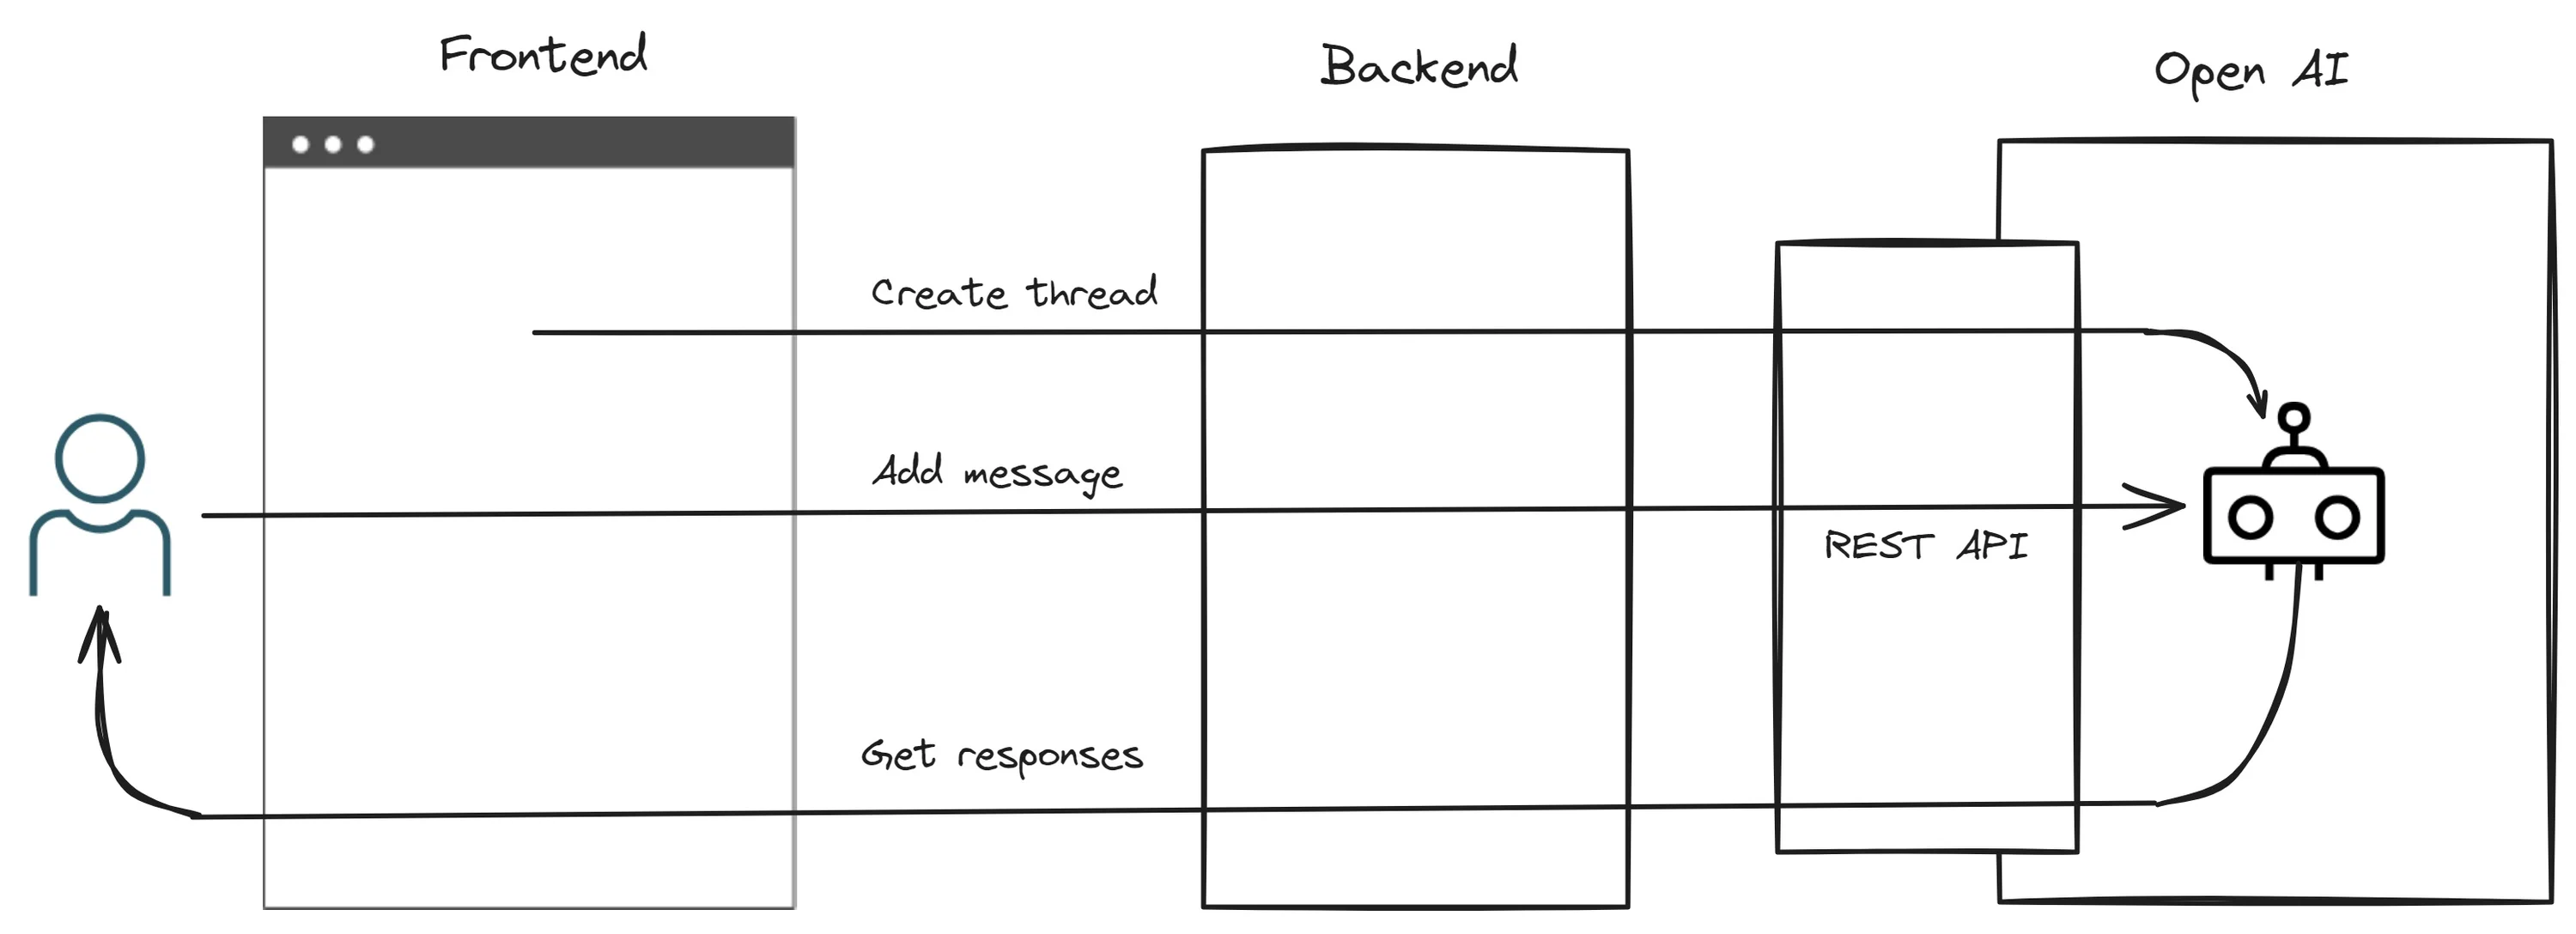
Figure 1. Basic operation of an OpenAI chatbot
Once you have signed up for OpenAI you’ll need to go to the API keys page and create your API key (or get an existing one) as shown in Figure 2. You’ll need to set this as an environment variable before you run the chatbot backend.
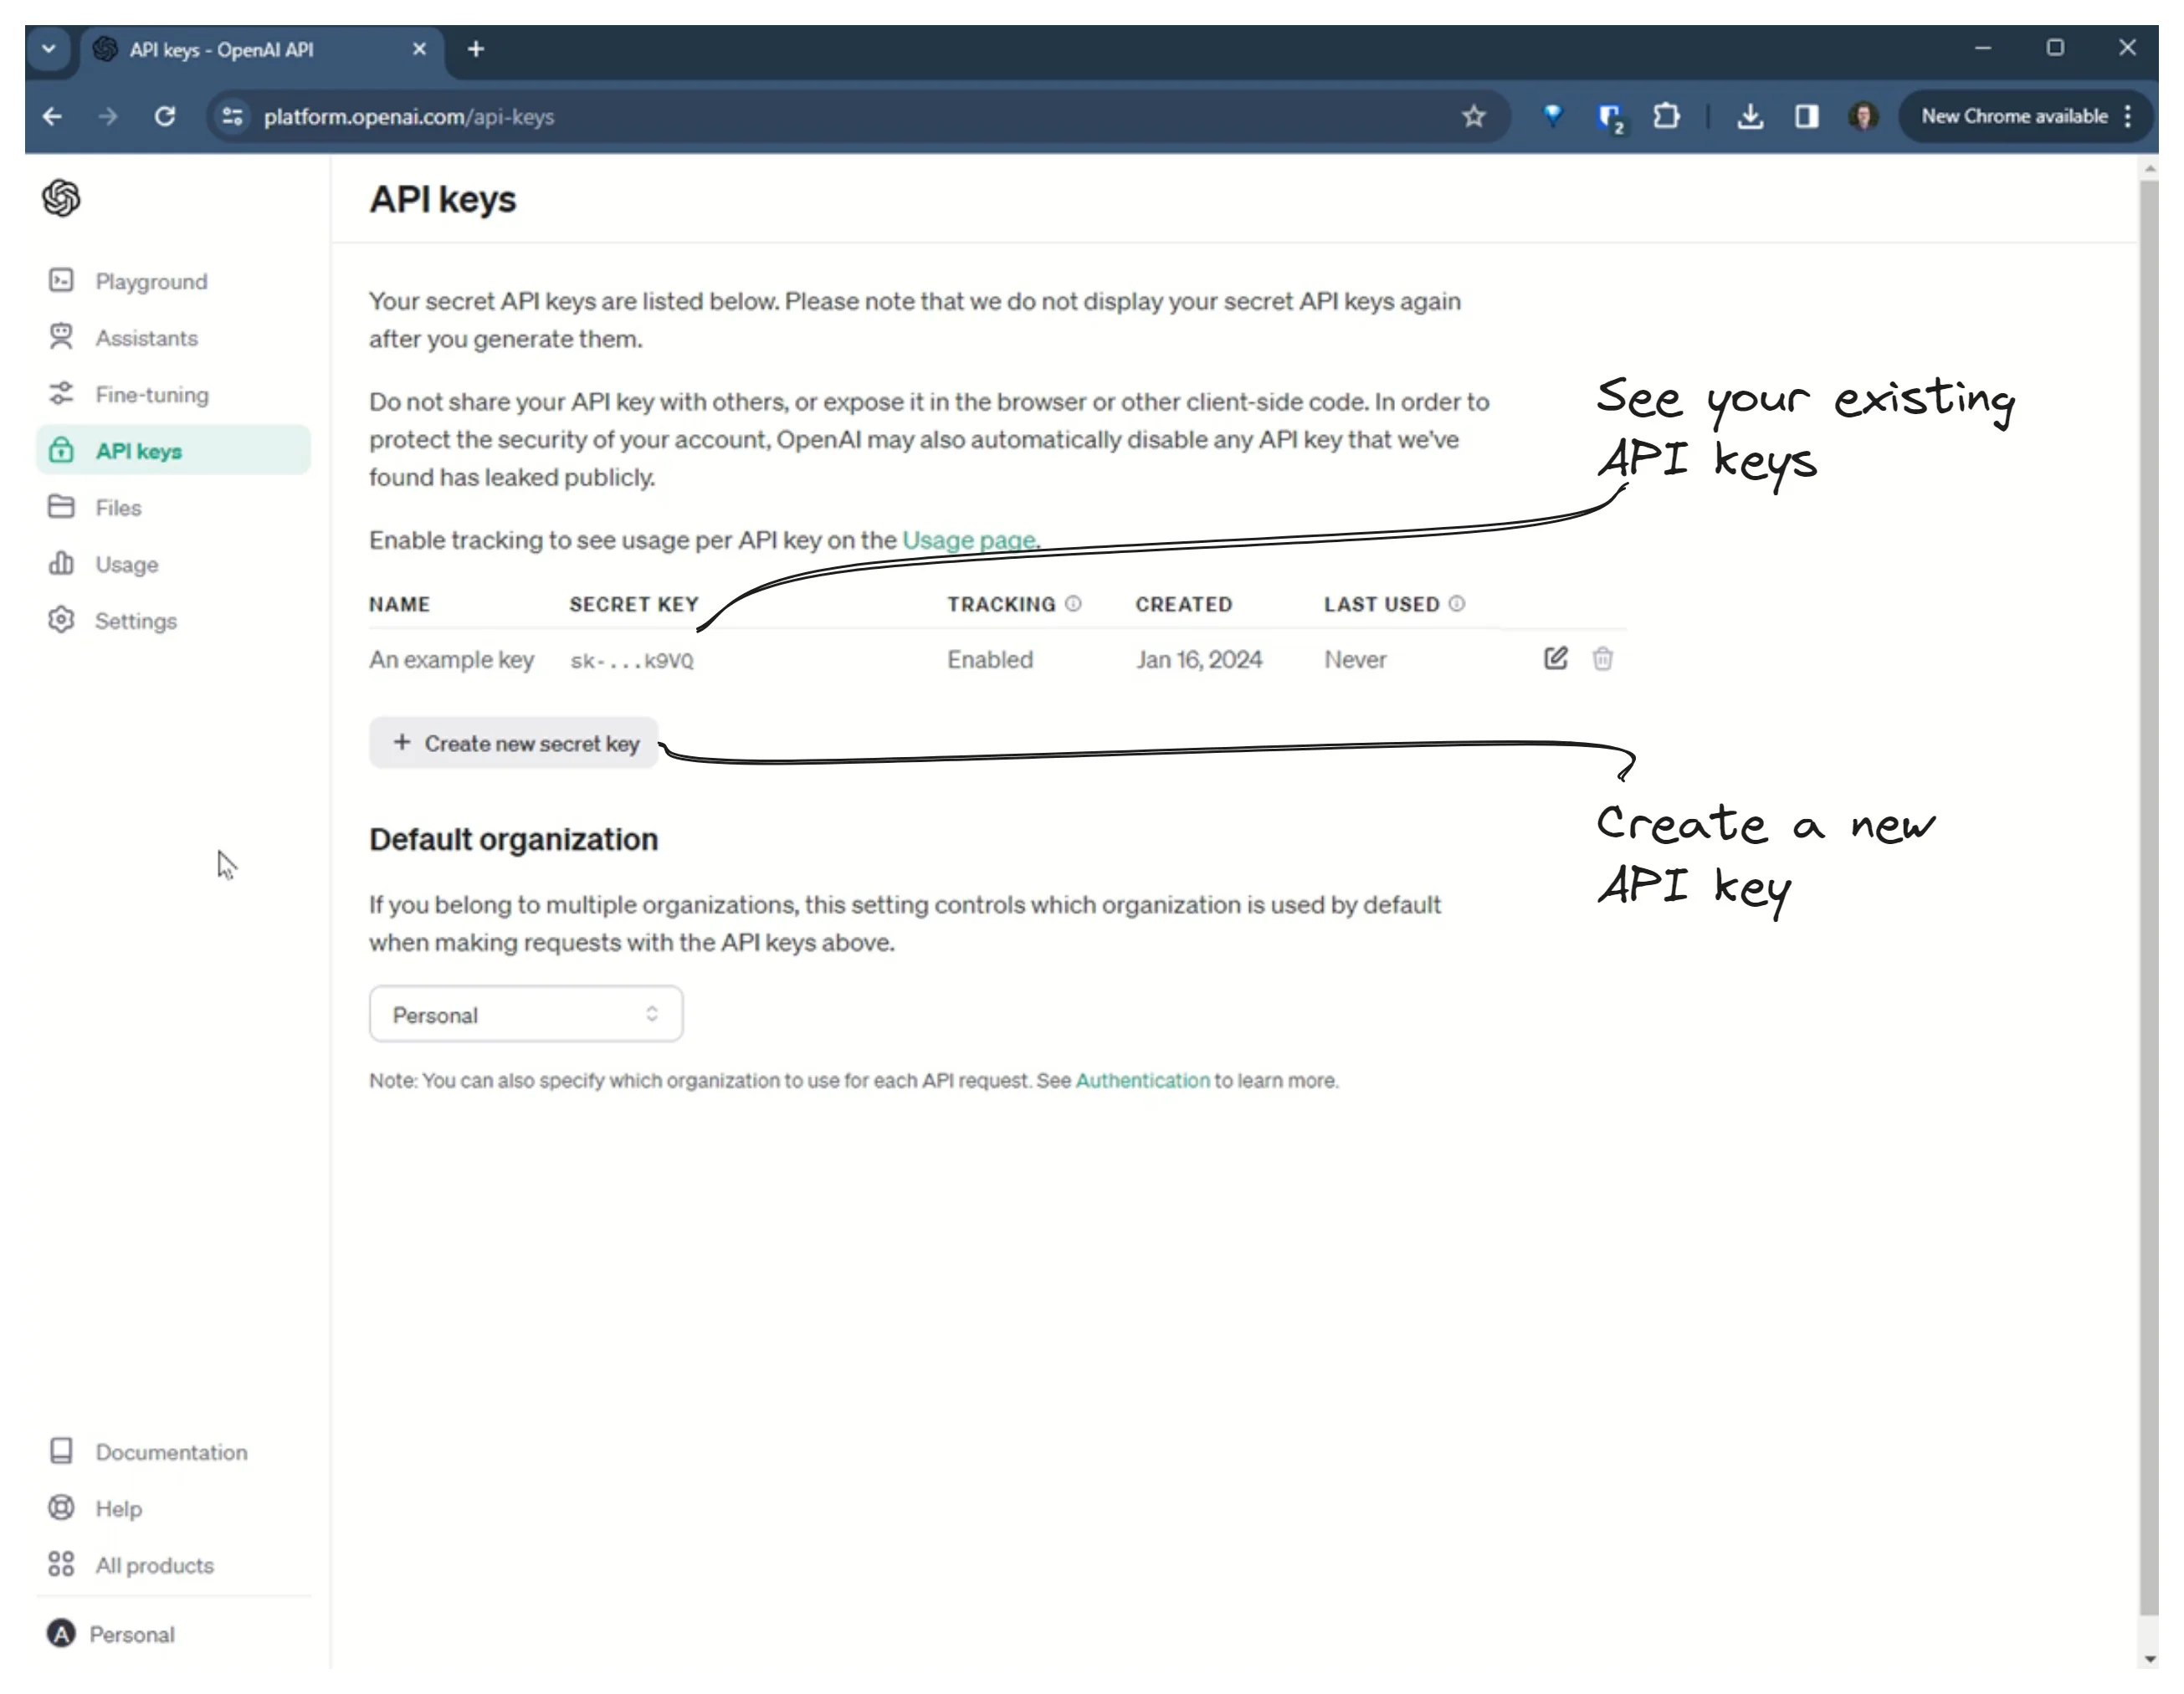
Figure 2. Getting an OpenAI API key
For the front end, I used an open-source UI framework at Tailwind Components that you can see in Figure 3. Many thanks to Porter-smith for making this available to all. This chatbot UI was built with HTML and Tailwind.
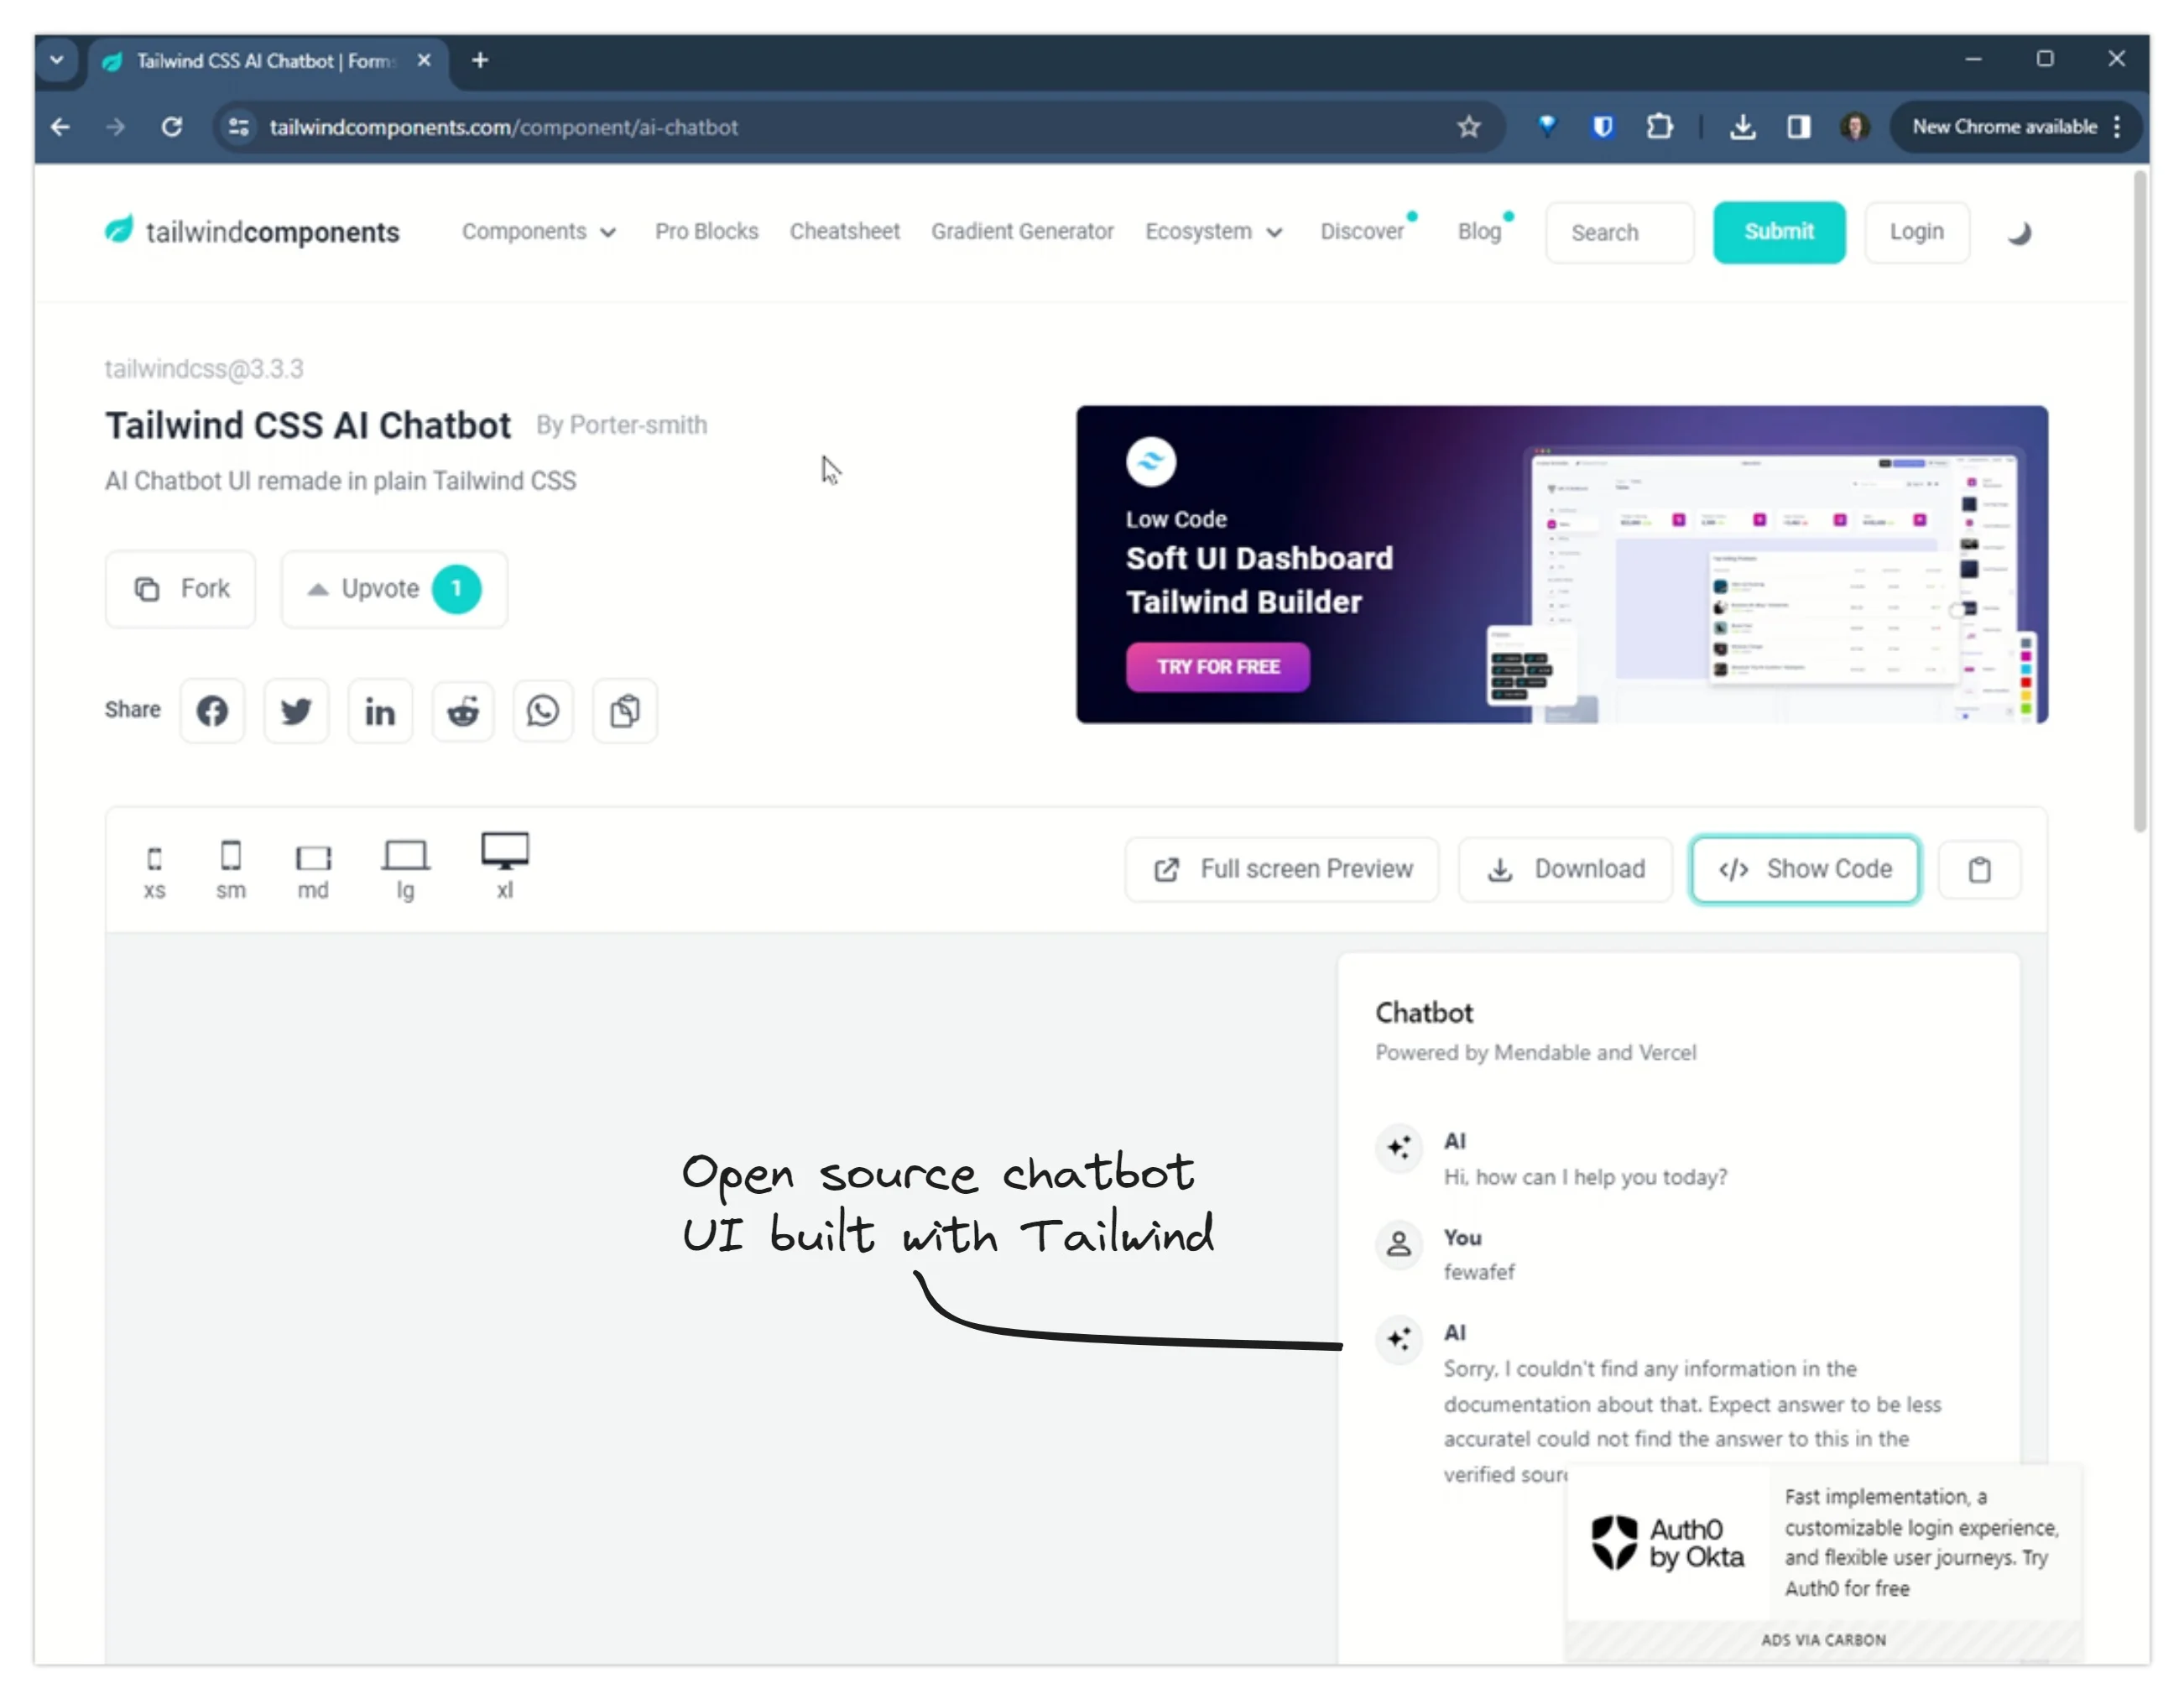
Figure 3. Getting a Chatbot UI
Back in the OpenAI dashboard, create and configure an assistant as shown in Figure 4. Take note of the assistant id, that’s another configuration detail you’ll need to set as an environment variable when you run the chatbot backend.
Also note the Test button in Figure 4. You can click this to try out your chatbot without leaving the OpenAI dashboard. This is really important because you can spend time writing frontend and backend code only to discover that the chatbot doesn’t actually do what you want. You should test your chatbot as much as you can here, to make sure it’s the right fit for your business and customer before you invest time integrating it into your application.
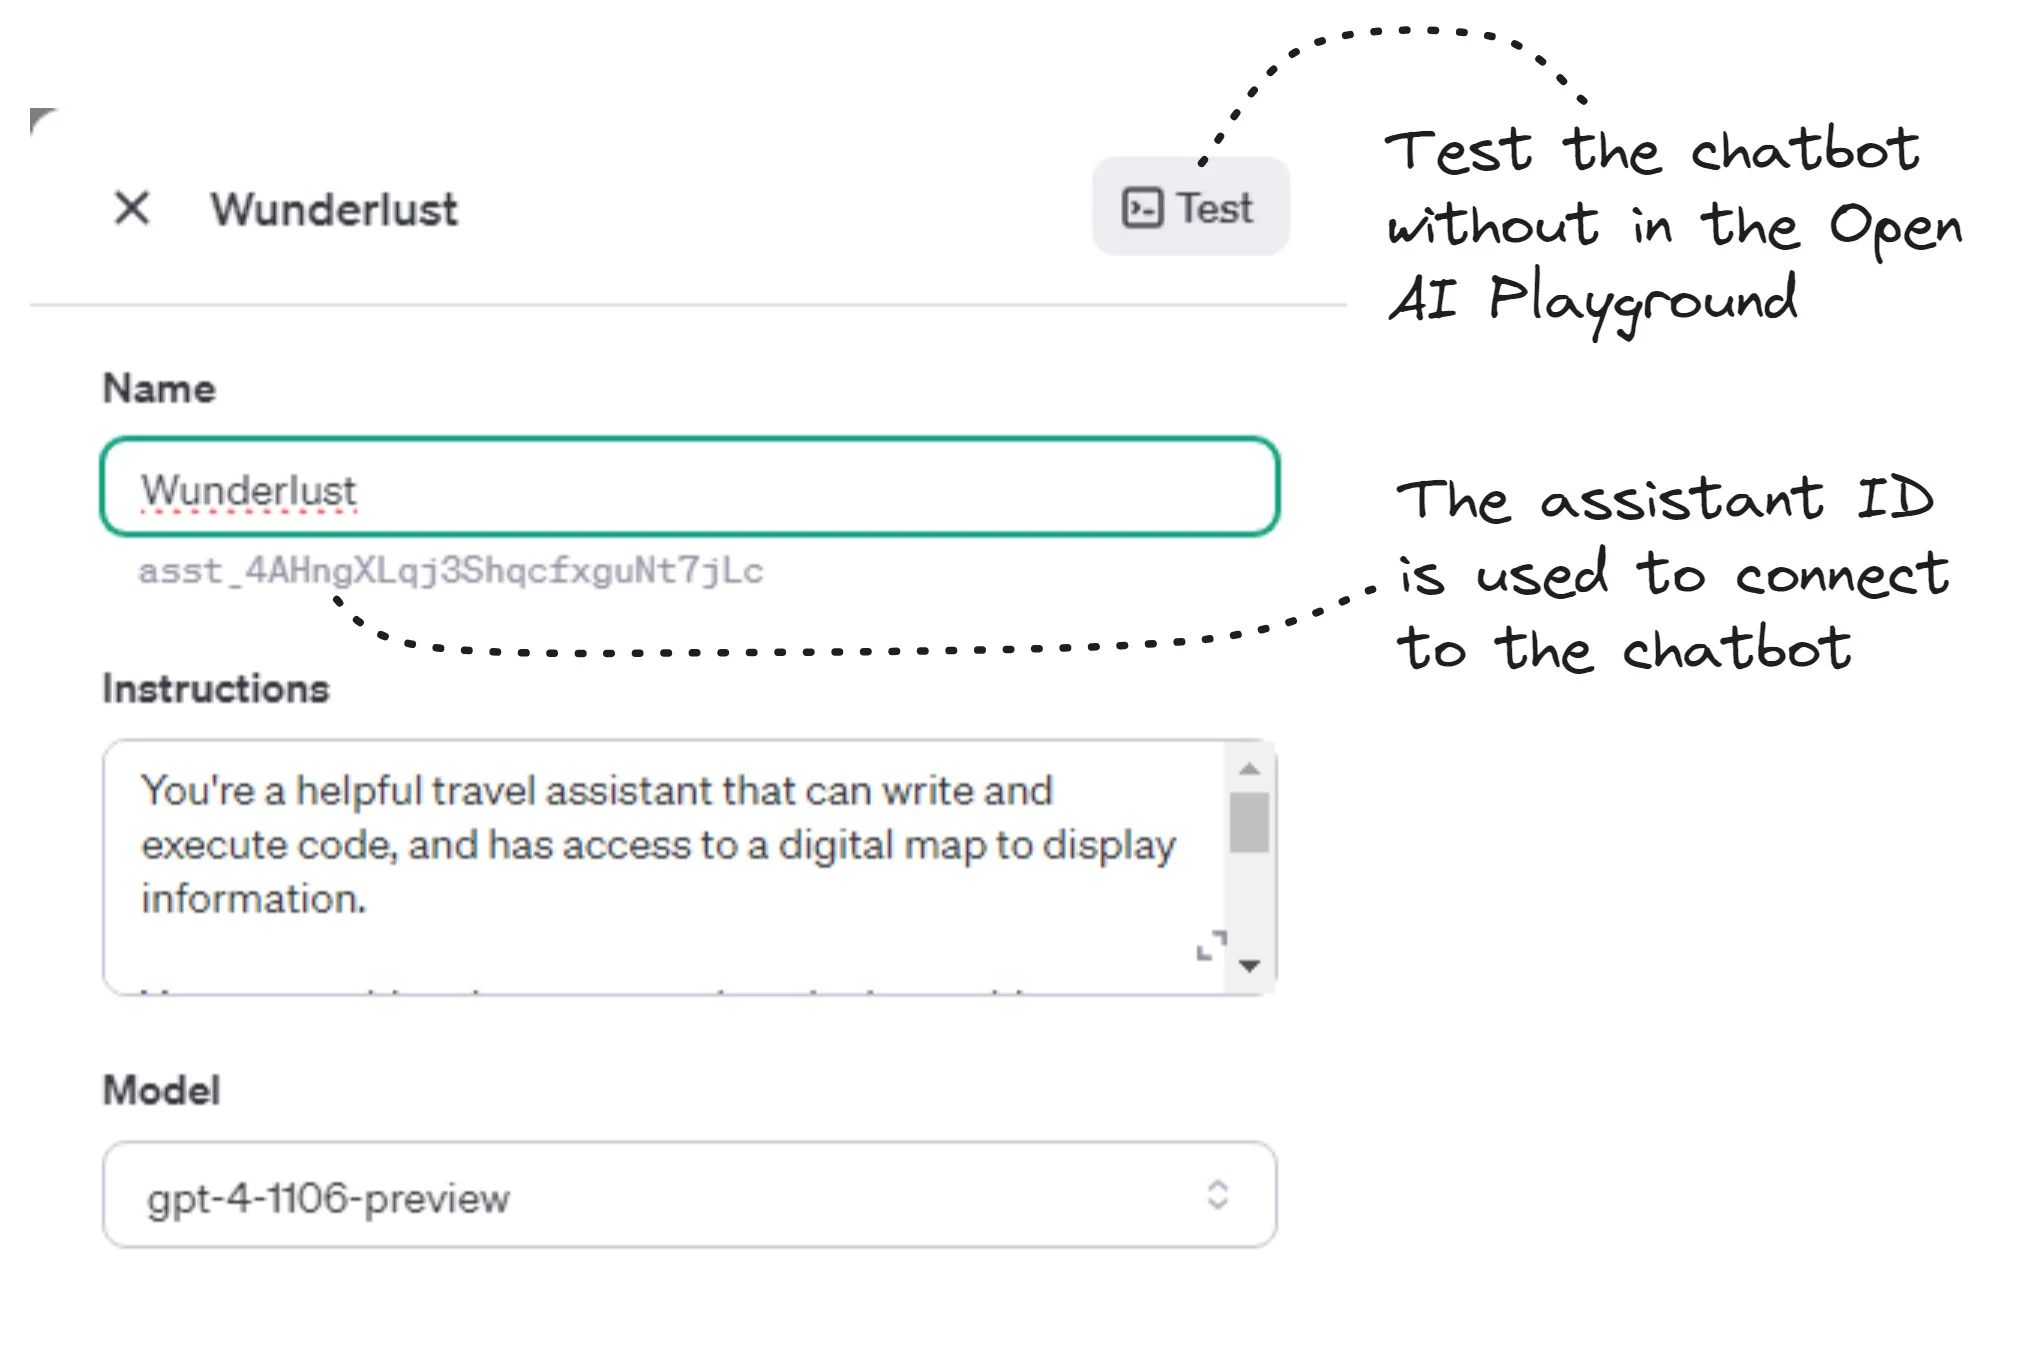
Figure 4. Creating an OpenAI assistant
After getting your API key and setting up yourOpenAI assistant you are now ready to write the code for chatbot. To save yourself a large chunk of your time you’ll probably want to run the code I’ve already prepared: https://github.com/ashleydavis/chatbot-example. Please see the readme file for instructions on how to run the backend and the frontend. Make sure you set your OpenAI API key and assistant ID as environment variables for the backend.
The example project is JavaScript and React for the frontend and JavaScript and Express for the backend. The choice of language and framework hardly matters, however you build this it will look roughly the same and needs to do the same sort of things.
Figure 5 shows how we create a new chat thread on page load. The frontend makes a HTTP POST request to the backend. The backend uses the OpenAI code library from npm to create the chat thread. This library simplifies the use of the OpenAI REST API.
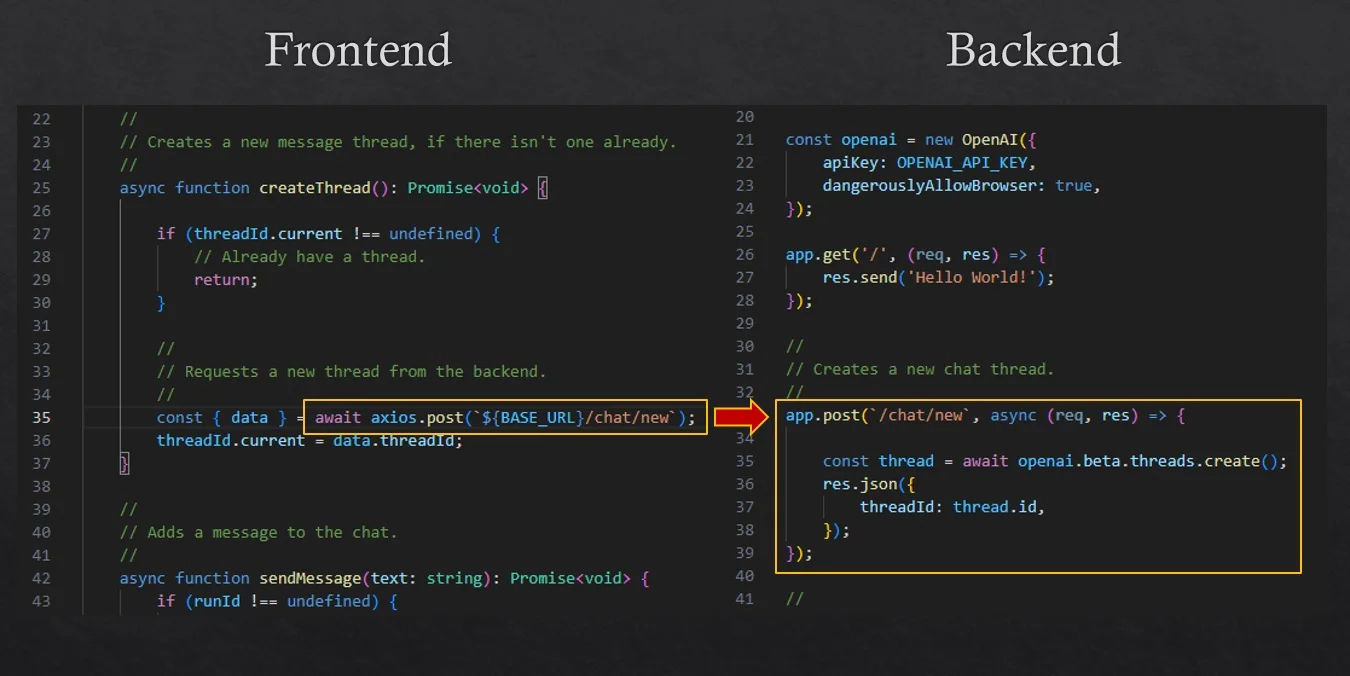
Figure 5. Creating a chat thread
As the user of our chatbot enters messages and hits the Send button we’ll submit to the backend via HTTP POST as you can see in Figure 6. Then in the backend we call functions in the OpenAI library to create the message and run the thread. Running the thread is what causes the AI to "think" about the message we have sent it and eventually to respond (it’s quite slow to respond right now, hopefully OpenAI will improve on this in the future).
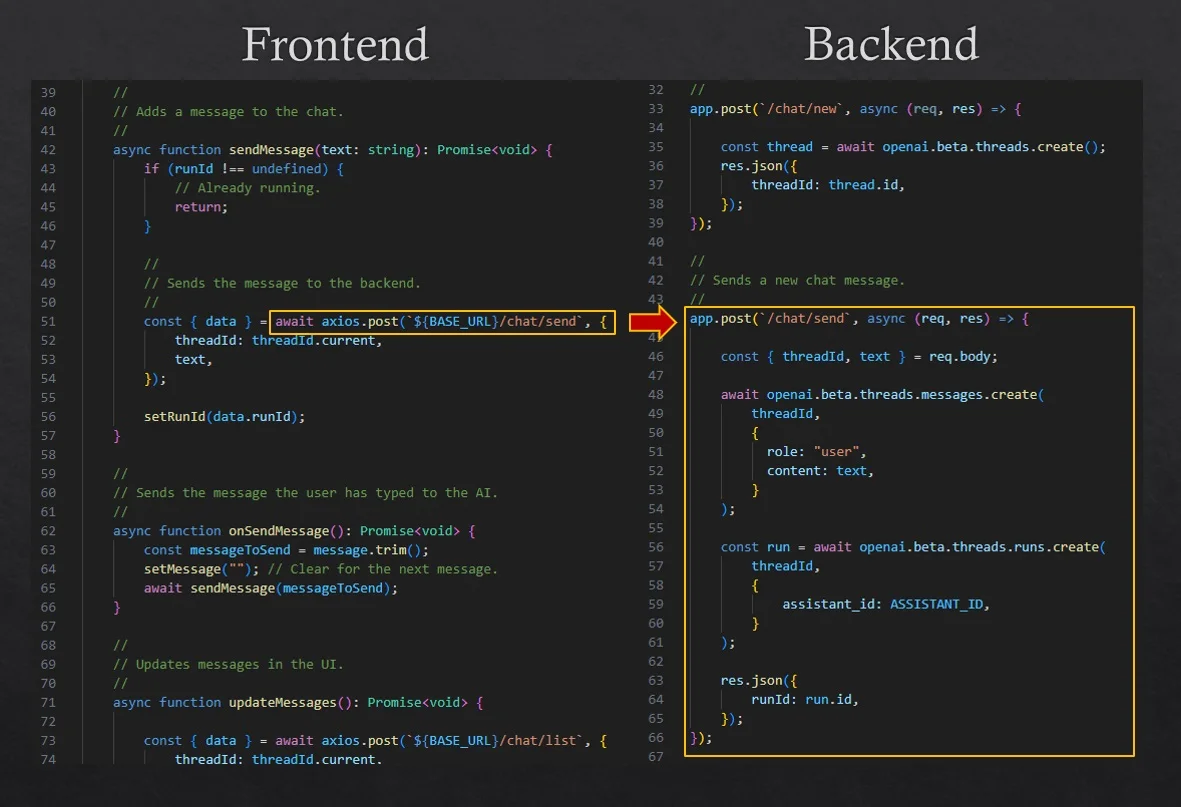
Figure 6. Adding a message to the chat thread
The frontend must then receive the response from the AI and display it to the user. We receive the response by polling for it. Periodically we do a HTTP POST request to the backend as shown in Figure 7. The backend calls OpenAI functions to retrieve messages and the status of the current run. From this we can display the message in the frontend (setting them in React state) and if the run has completed, we can terminate the polling.
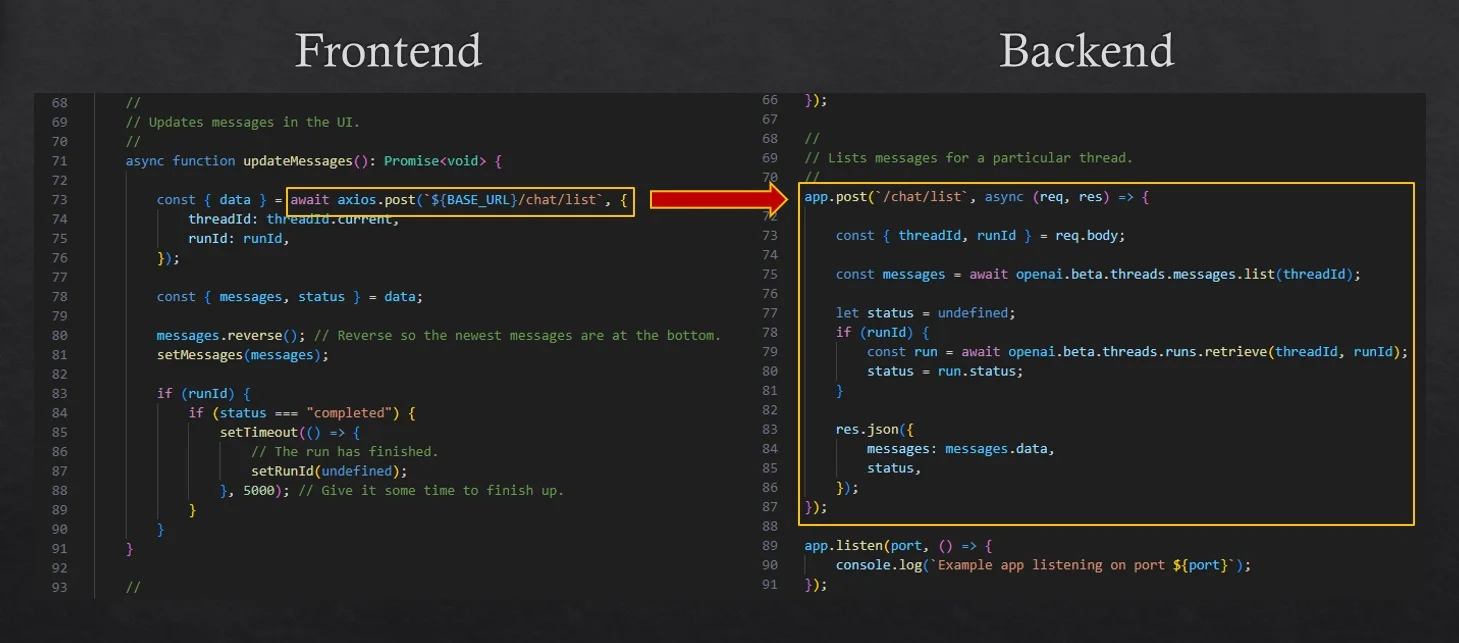
Figure 7. Retrieving chat messages
And that’s it for a basic chatbot. To recap the most important parts:
- Create a chat thread on page load;
- As the user enters messages we submit them to OpenAI; and
- As the AI generates responses we display them to the user.
Adding custom knowledge to the chatbot
Having a basic chatbot by itself isn’t very useful. It doesn’t give us anything more than what we can already get by using the ChatGPT user interface. But now that we have the basic chatbot we can extend it and customize it in various ways.
The first way is to add customized knowledge to our chatbot. This is done quite easily and we don’t need to add any new code to your chatbot. In the OpenAI Playground, navigate to your assistant, enable Retrieval, then click Add to upload PDF and CSV files as indicated in Figure 8. OpenAI will scan your documents and endow your chatbot with the knowledge contained therein.
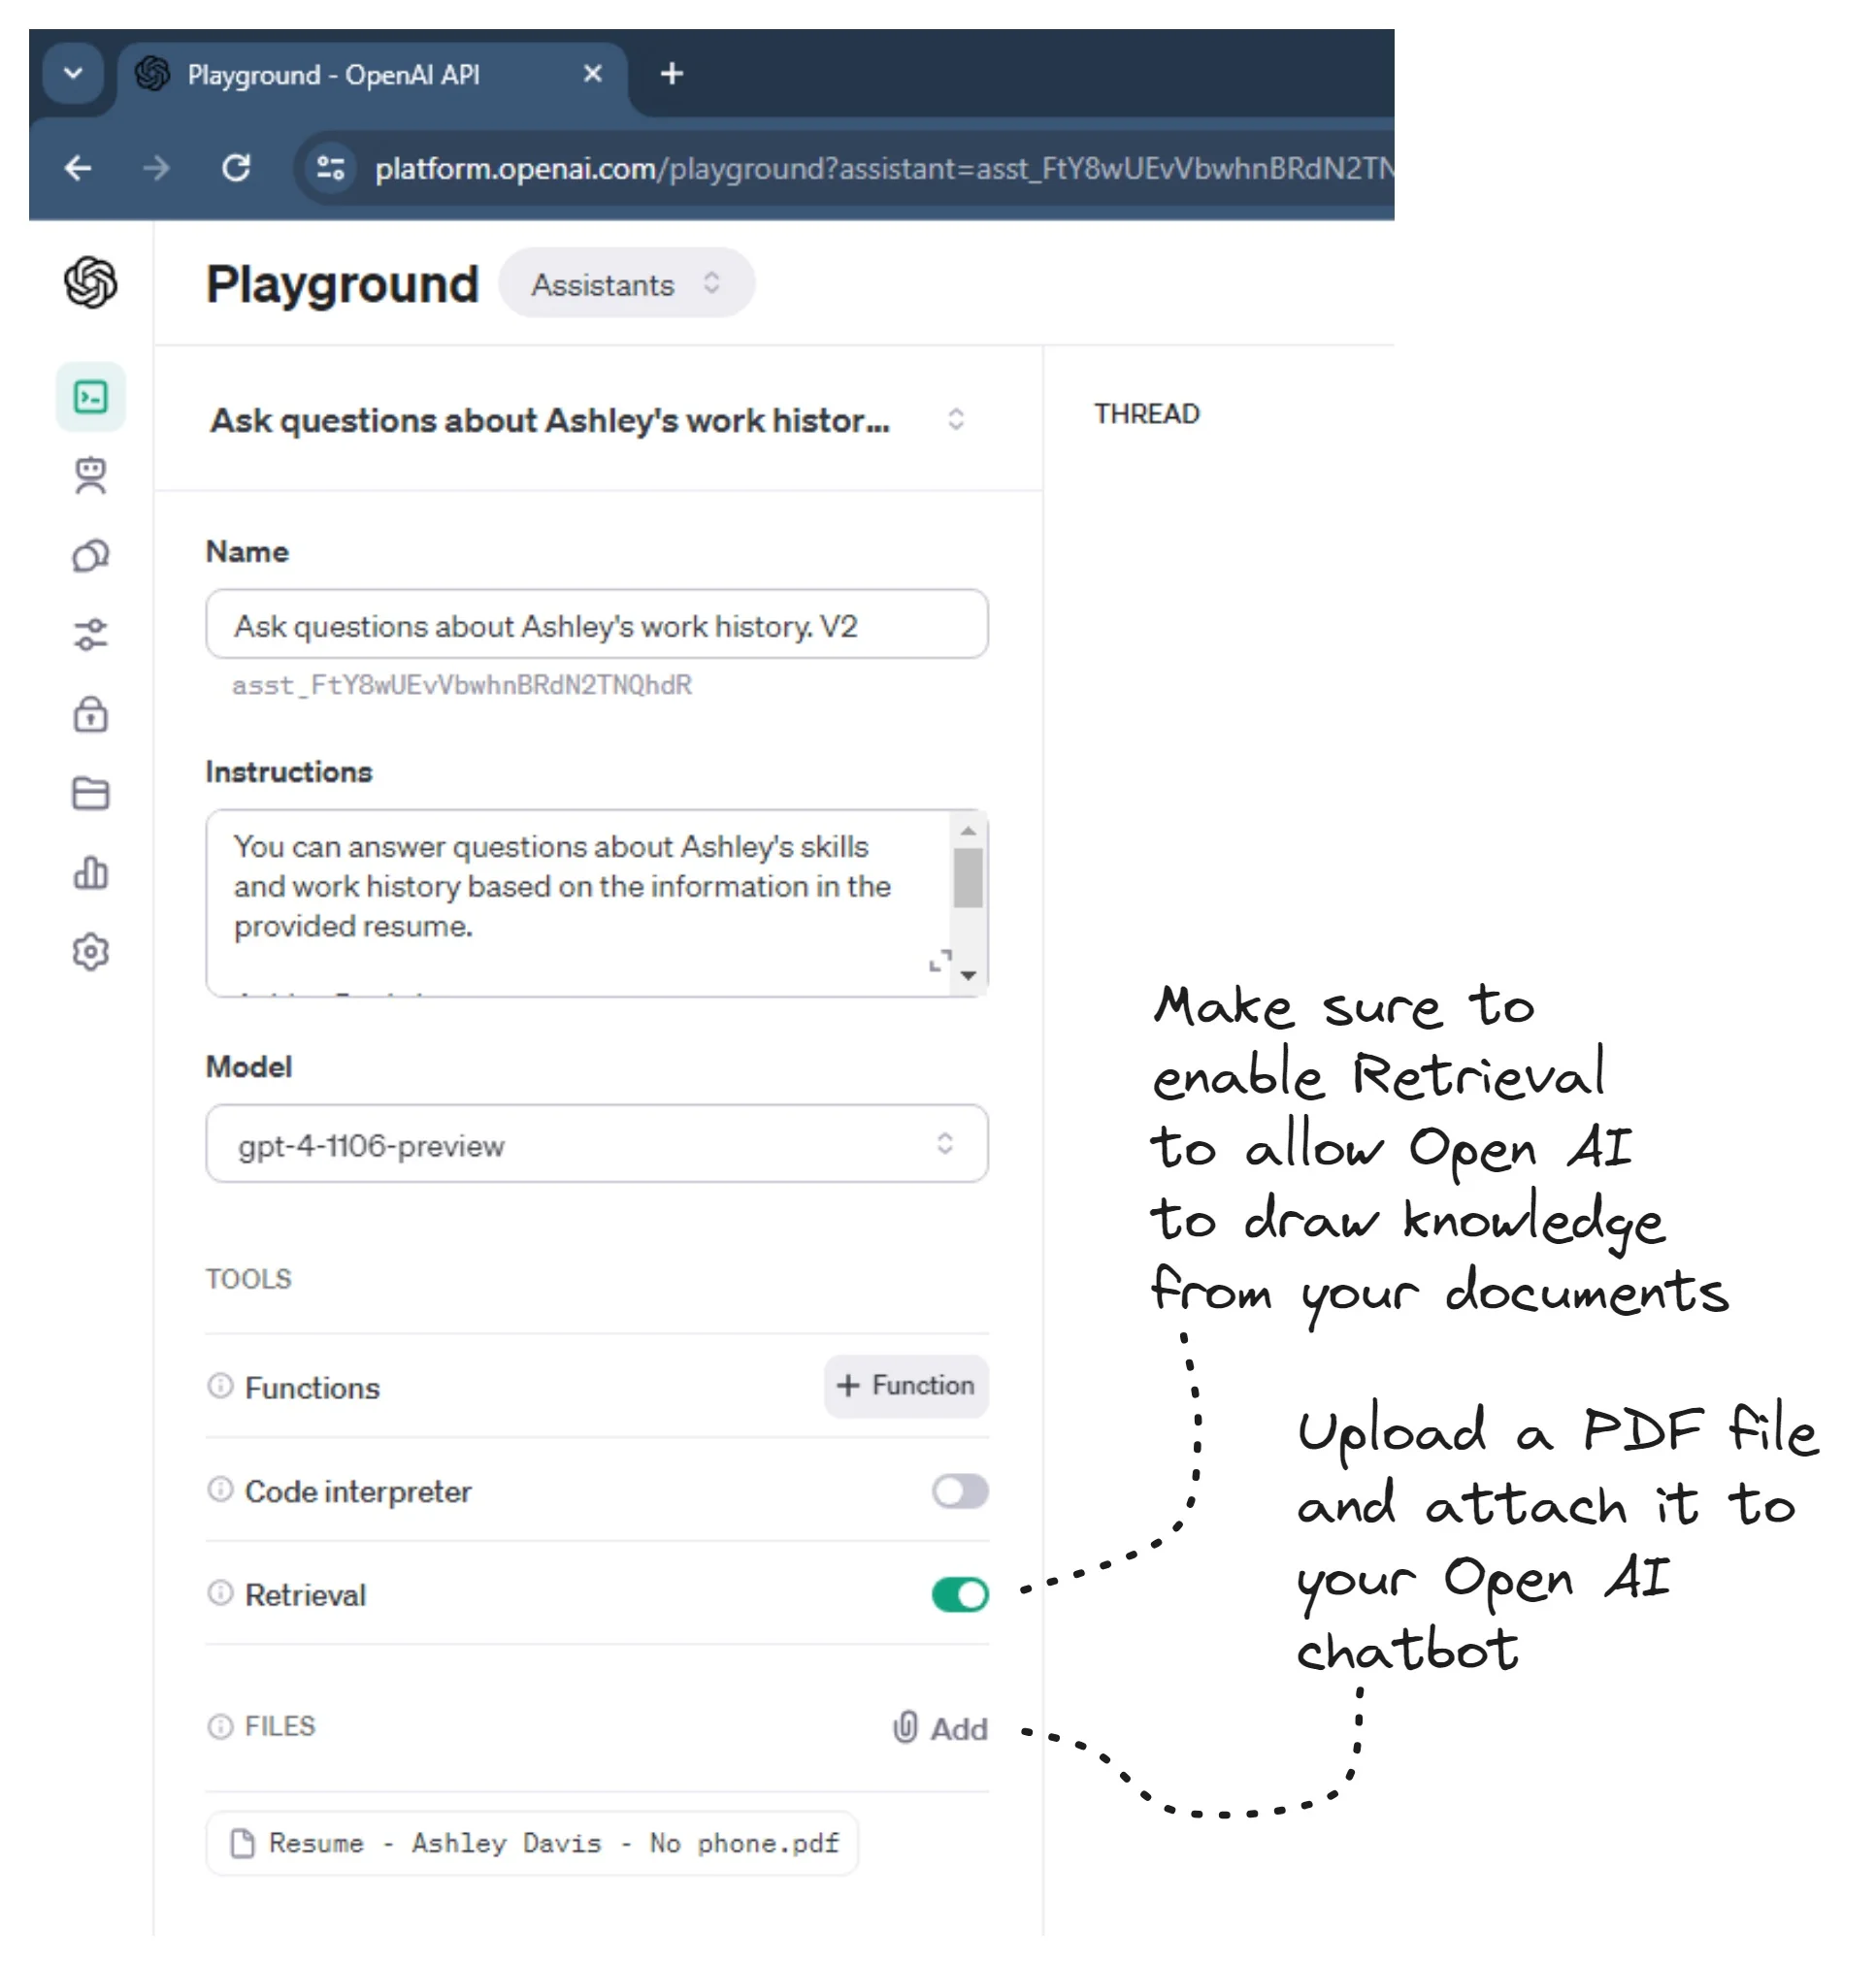
Figure 8. Uploading documents to your assistant in OpenAI
At this point you can test your assistant directly in the OpenAI Playground. Again, I recommend doing this before you commit to writing any code for your chatbot. This allows you to test the water and see if the assistant can meet your needs before you invest significant time into it. Try asking some questions that are specific to the content that is in the PDF file you have uploaded. In my example I uploaded a PDF of my resume and I was able to ask questions like What skills does Ashley have? The chatbot came back with a nice summary of the skills that are described in my resume. Try it out for yourself in the live demo.
Seriously, that’s all that’s needed to give a chatbot custom knowledge about yourself, your company, your product or anything else that you could document in a PDF or CSV file.
Customizing the behavior of the chatbot
The next step of sophistication for your chatbot, this time something you can’t test in the OpenAI Playground, is to give the chatbot the ability to perform tasks in your application.
For example, imagine you are creating an email client and you want to expose things like "send email" and "check for new emails" so that the user could invoke these actions by talking to the chatbot. In my version of OpenAI’s Wunderlust demo you interact with the map asking questions like Show me where Paris is and Mark a good location where I can take a photo of the Eiffel tower. Try it for yourself in the Wunderlist live demo, it’s pretty amazing.
The code for the Wunderlust example is available here:
https://github.com/ashleydavis/wunderlust-example
To continue following along and running the code for yourself, clone the repository to your computer:
git clone https://github.com/ashleydavis/wunderlust-example.gitFollow the instructions in the readme to run the frontend and backend for the wunderlust-example.
We extend the abilities of our chatbot by allowing it to call functions in our code. In my example I’ve created a map based application (inspired by OpenAIs Wunderlust demo) and so the functions are to update the map (center position and zoom level) and add a marker to the map. You can see the JavaScript implementation of these functions in Figure 9.
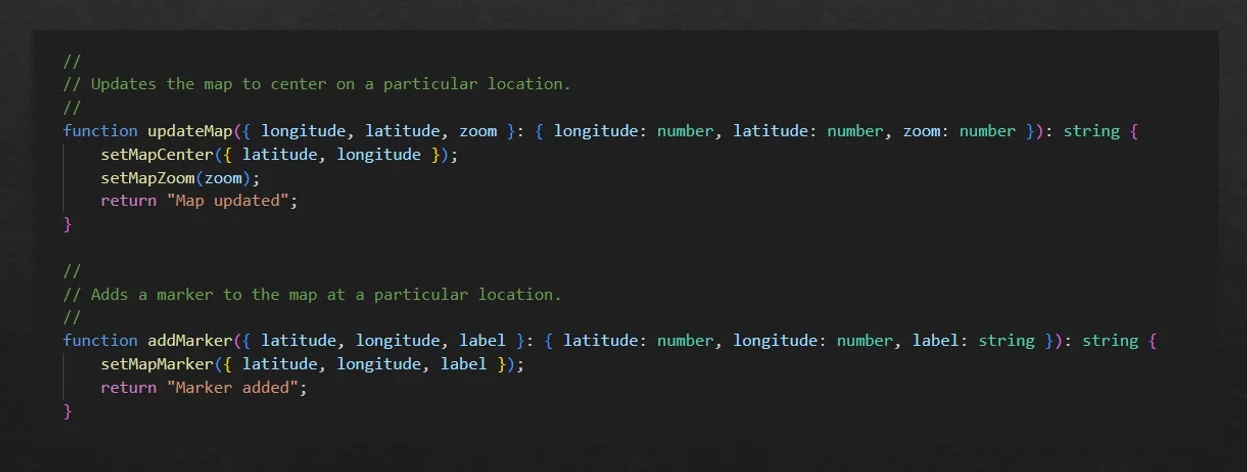
Figure 9. Creating functions to expose the capabilities of your application
Our chatbot can’t call these functions unless it knows about them. So we need to tell OpenAI what they do by configuring metadata for each function. This includes the name of the function, a description of what it does and descriptions of its inputs and outputs. You can see the JSON description of the updateMap function that I have added to the assistant in OpenAI in Figure 10.
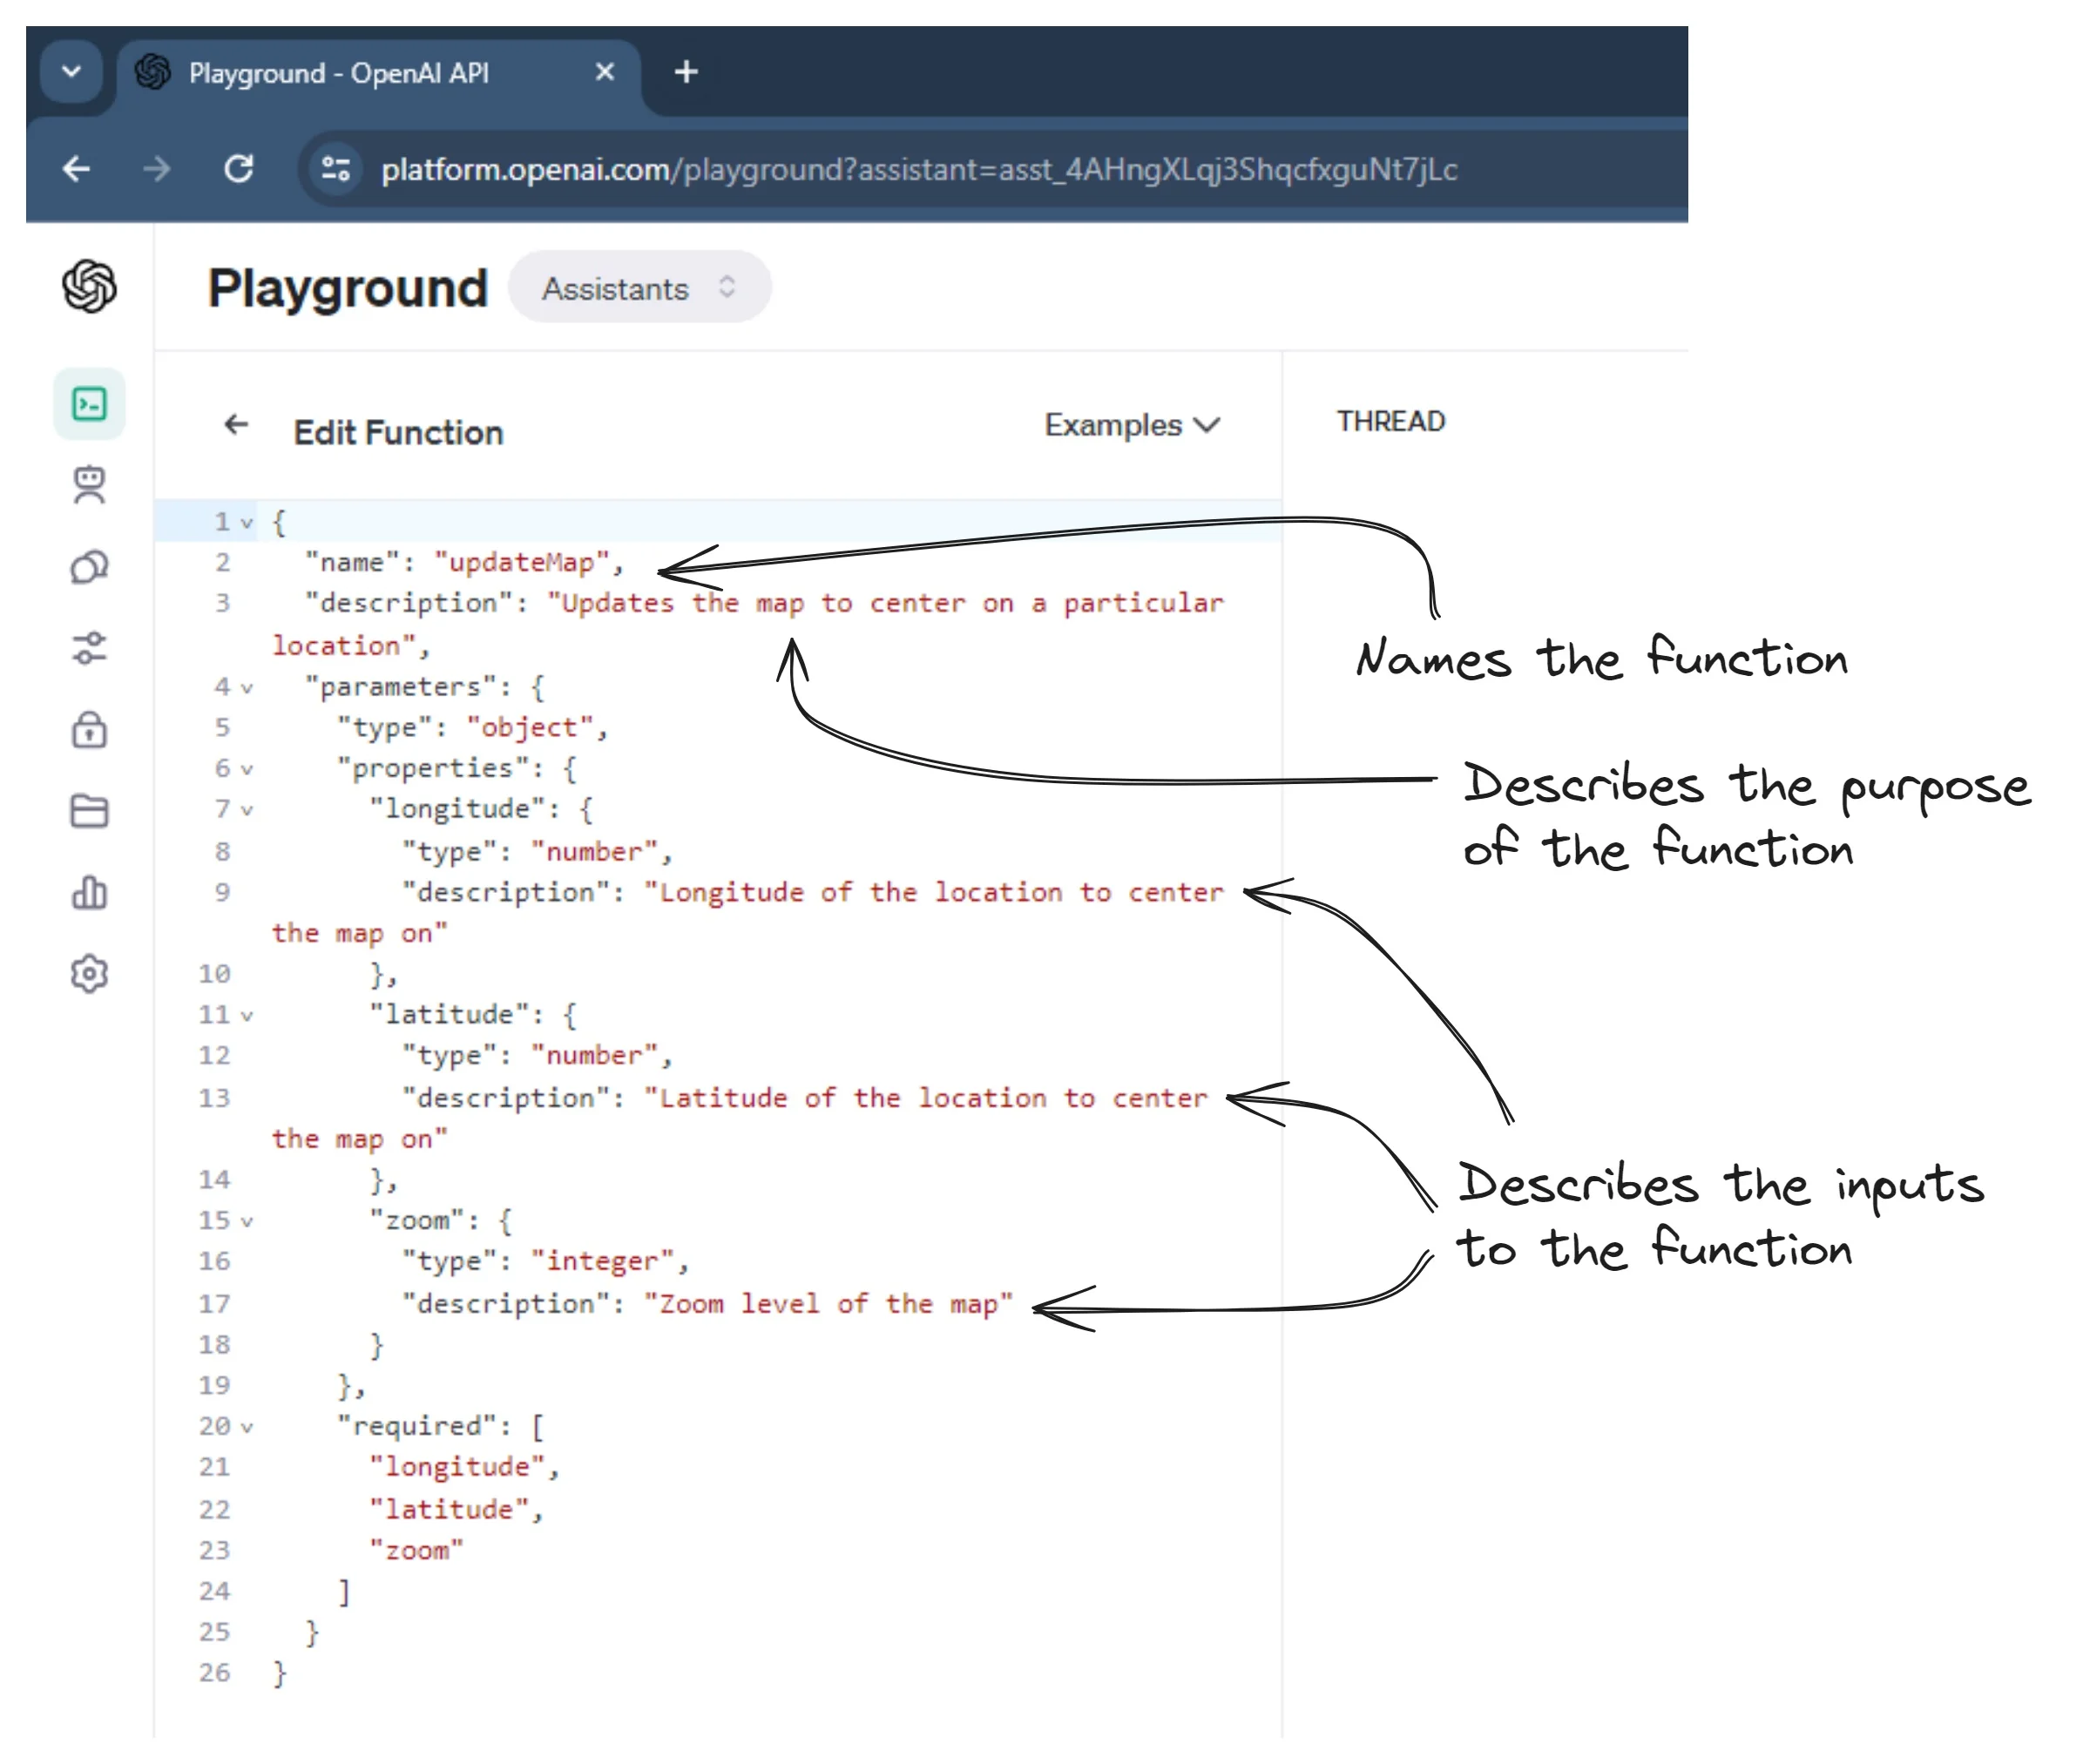
Figure 10. Describing our functions in JSON format
Describing the features of our application in this way gives OpenAI the ability to invoke those features based on natural language commands from the user. But we still need to write some code that allows the AI to invoke these functions. You can see in Figure 11 in our chatbot message loop how we respond to the chatbot’s status of "requires_action" to know that the chatbot wants to call one or more of our functions.
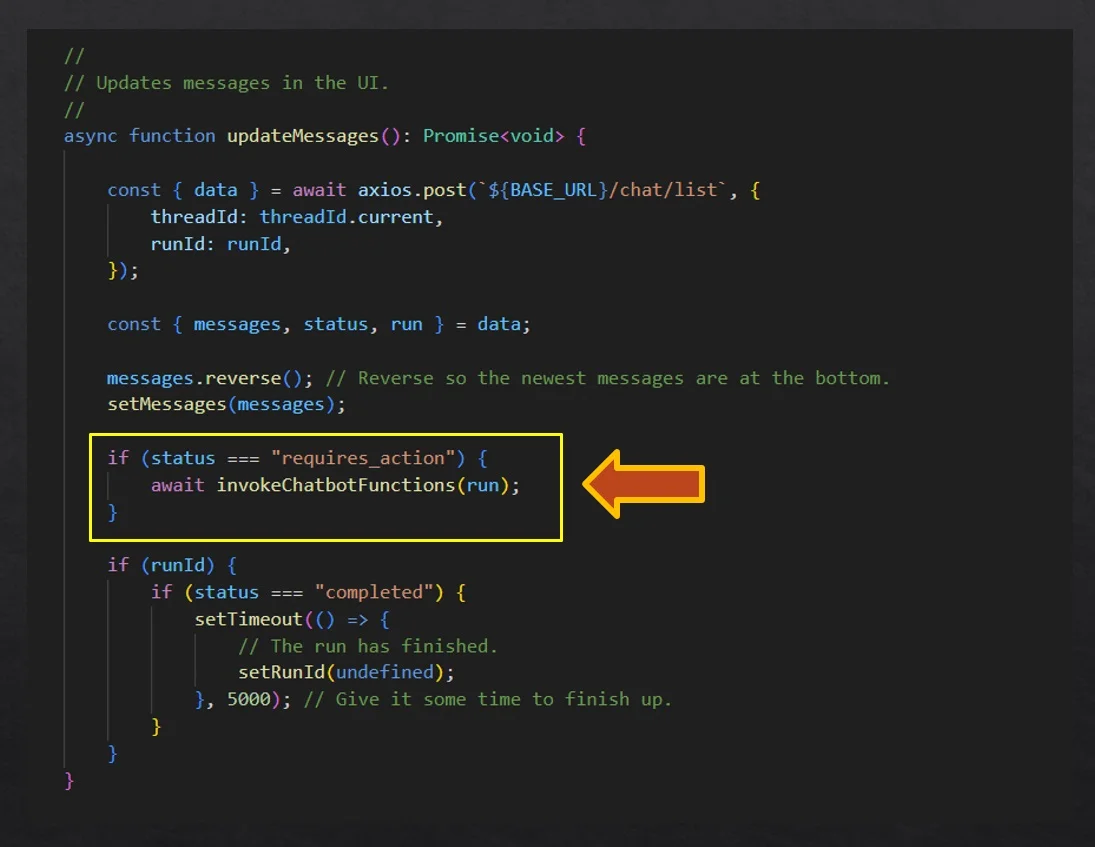
Figure 11. Integrating function calls into our chat loop
We must then enumerate the list of functions the chatbot wants to call, call those functions, collect their outputs and then submit the function outputs to OpenAI via a HTTP POST to our backend. You can see this in Figure 12.
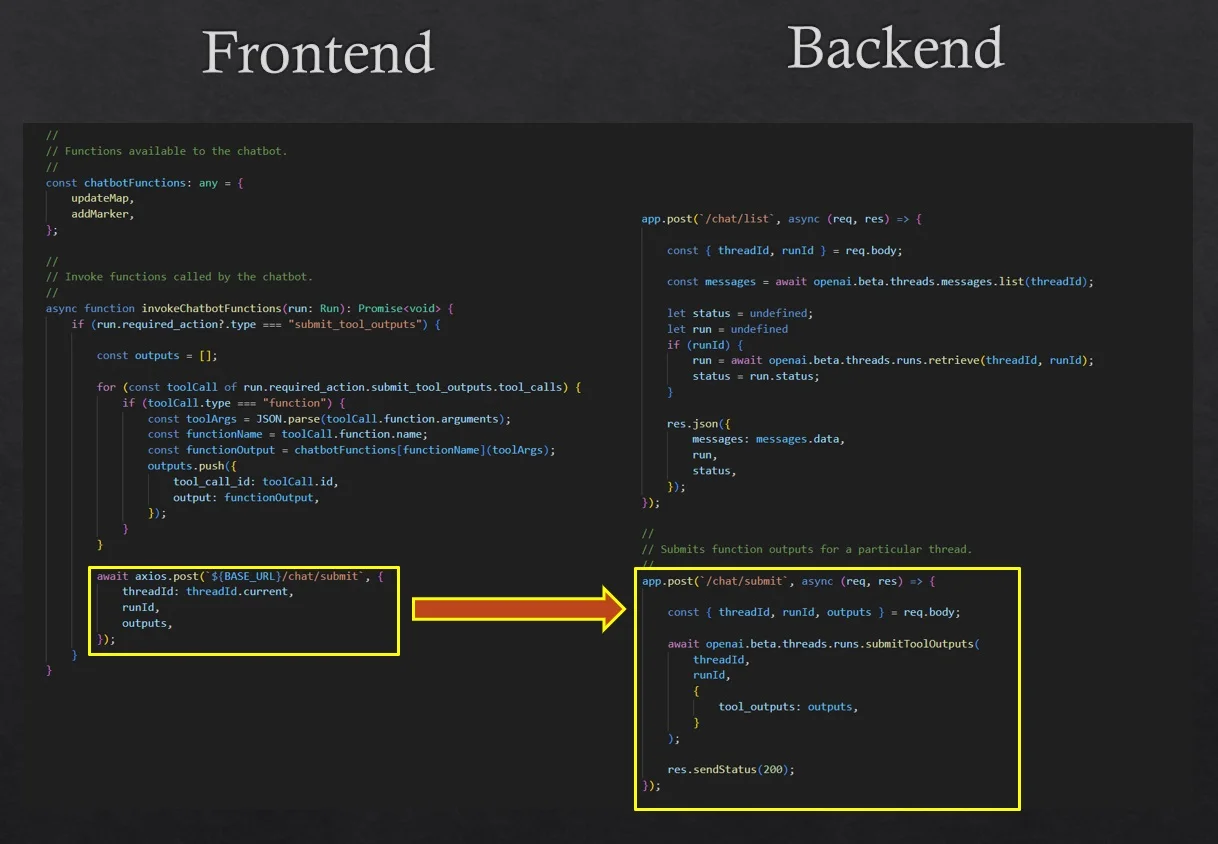
Figure 12. Invoking requested functions and submitting their results to OpenAI
It has been a bit more work to allow the chatbot to call functions in our application. But now we have an extensible setup where we can continue to add more functions to our chatbot, exposing more and more application features that can be used through the natural language interface.
Enabling voice control
To enable an even better experience for our user, we’ll now extend our chatbot so they can interact with it using their voice. You may have already noticed the microphone button in the Wunderlust demo, if not try it out. Click the button and speak to the chatbot. Try saying show me the tallest mountain in the world. It should center the map on Mount Everest.
This is fairly simple using a combination of the audio capture capability of modern web browsers and OpenAI's speech transcription service.
First we must ask permission from the user to capture audio in their browser. You can see how this is done in Figure 13.
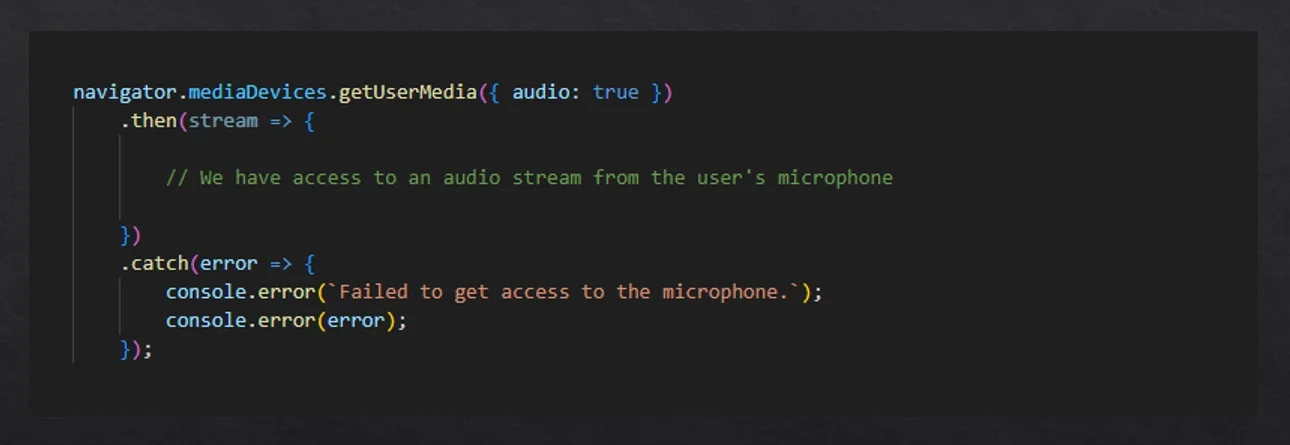
Figure 13. Requesting permission to record audio in the browser
After retrieving the audio stream we can create a MediaRecorder object from it. We can handle the event ondataavailable to collect the chunks of audio incoming from the stream as shown in Figure 14.
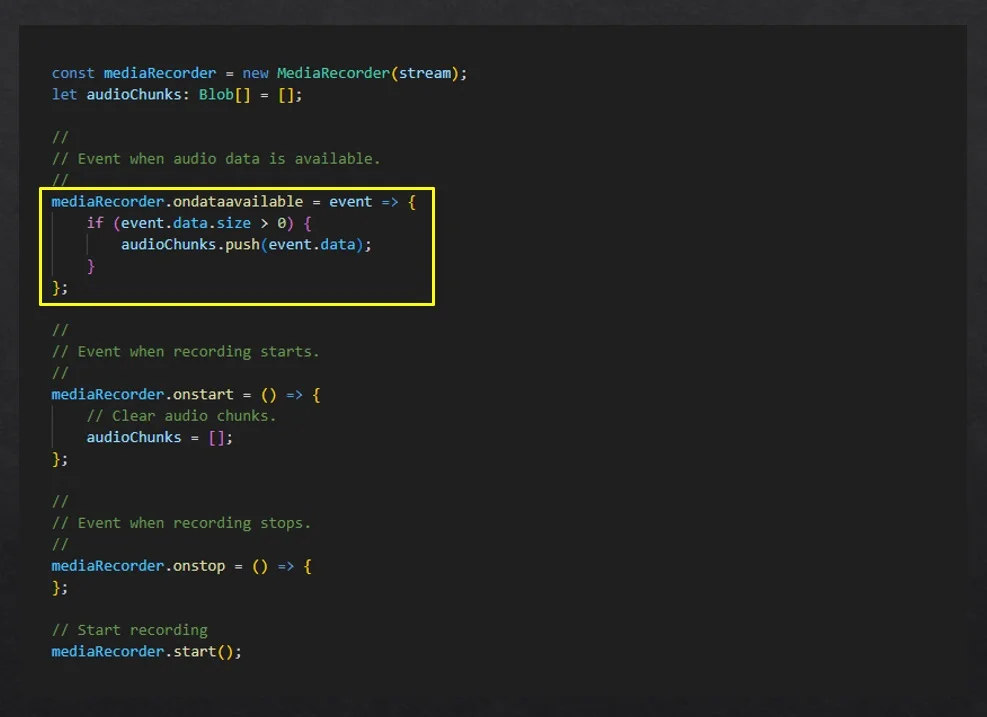
Figure 14. Capturing audio with a media recorder
When the user stops recording the onstop event is triggered. This is where we aggregate the audio chunks and submit them to the backend via HTTP POST. The backend then uses OpenAI to transcribe the audio to text. The text is simply added to the chat thread as the next message from the user. You can see how this works in Figure 15.
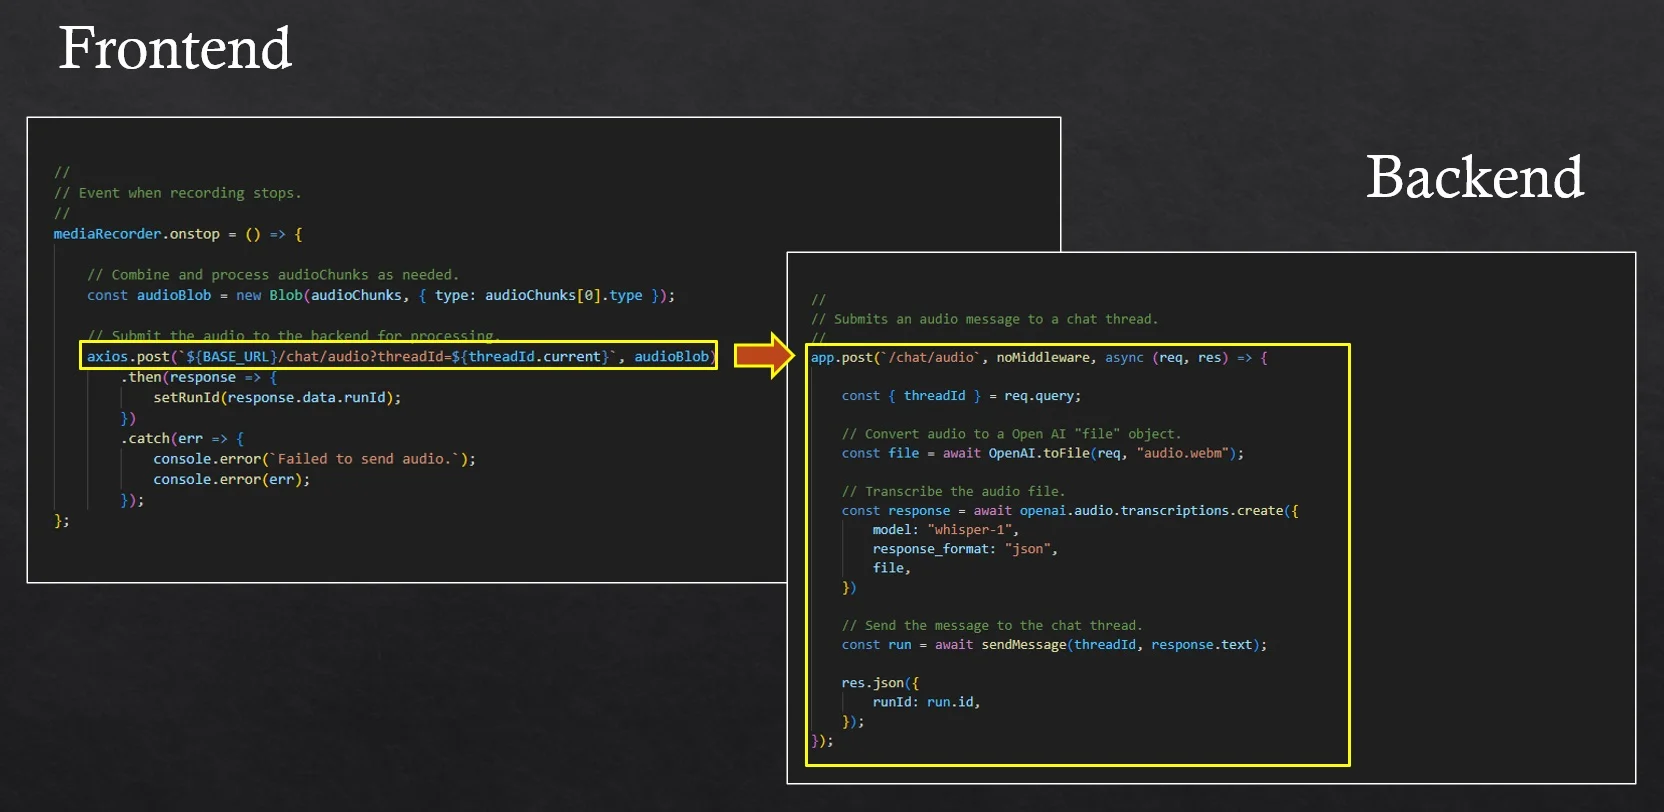
Figure 15. Submitting audio for transcription and adding it to the chat thread
We now have a chatbot that we have imbued with custom knowledge, that can invoke actions on our behalf and that we issue commands to by talking rather than typing. Of course OpenAI has done all the heavy lifting here. After the initial hard work of building our application, subsequently adding a chatbot wasn’t all that difficult.
Natural language interfaces are the future
We’ve seen how easy it is to add a natural language interface to our application and there are many business use cases we can use this for:
- Using Chatbots as representatives of our organization and allowing the public to ask questions about us, our company, our product or an event - just by giving the chatbot the documentation we already have. Imagine an event management application and the user asking What time do I have to leave home to arrive on time at the 10am workshop by John Smith?
- Allowing customers to interact with our application in their native language either by typing or speaking. We can give them the freedom of how they choose to interact with our software.
- Exposing all the features of our application means that users will no longer have to search the internet to figure out how to do the thing they want. They'll just describe what they want. It might take a few turns of the message thread, with the chatbot seeking clarification, but with the chatbot’s help they can find the functionality they are looking for without leaving the application.
- Giving the chatbot access to all features allows it to intelligently use them in unanticipated combinations in order to figure out what a user wants. I’m already surprised at the unusual ways some customers use my software. Adding a chatbot opens the door to even higher levels of creativity from our customers.
- Querying our application for very specific things. Imagine the event application again. Who is the other speaker presenting with John at 10am?
- Exposing all the data in our application to the chatbot through a CSV data file allows the users to query for data analysis. Show me a chart so I can compare the running times of all sessions at the conference. If you have already tried uploading a CSV data file to ChatGPT and asked it to produce charts and analyze the data, you already know how powerful this is - and it’s still only early days! It’s going to change how we interact with our data.
Given the ease of adding a chatbot to an application and the sheer usefulness of it that there will be a new wave of them appearing in all our most important applications. I see a future where voice control is common, fast, accurate and helps us achieve new levels of creativity when interacting with our software.
You can imagine that when this becomes ubiquitous that the voice interface will be built into our operating systems. Indeed you don’t have to imagine, it already is built into mobile devices. But a key difference in the future will be that applications will expose their capabilities, allowing us to verbally execute commands and make queries, but not just that, we’ll be able to stitch together tasks and coordinate activities between different applications. A query like How do I get to my appointment on time? involves interaction between the calendar, clock and the map.
The only thing that’s wrong with this whole picture: these chatbots need a connection to the internet to operate. This needs to change. I sincerely hope that we can make them operate offline. Our large language models are big, presumably too big to run locally on a device - but there’s no reason this can’t change in the future. As the models are optimized and reduced in size and as our devices continue to grow more powerful we should eventually be able to run our AI models locally rather than in the cloud. As I write these words I’m preparing for a weekend out of service. I am looking forward to disconnection and a digital detox, but that doesn’t mean I won’t miss my intelligent friend ChatGPT.